Expose Localhost to Internet: Cloudflare Tunnel Alternative to ngrok
Need to share your local development site with a client? Testing webhooks that require a public URL? You've probably used ngrok—and paid their monthly fees for basic features like custom domains.
Cloudflare Tunnel is another option. Cloudflare Tunnel (formerly Argo Tunnel) offers:
- ✅ Public hostnames on domains you manage in Cloudflare
- ✅ Stable hostnames that can be reused after a tunnel restarts
- ✅ Usage subject to your current Cloudflare plan and policies
- ✅ One-click setup in FlyEnv—no command line needed
Why Developers Are Switching from ngrok
| Feature | ngrok Free | ngrok Pro ($8/mo) | Cloudflare Tunnel |
|---|---|---|---|
| Custom domains | ❌ | ✅ | ✅, subject to plan |
| Stable hostnames | ❌ | ✅ | ✅, with managed DNS |
| HTTP/2 support | ✅ | ✅ | ✅ |
| Usage limits | Plan-dependent | Plan-dependent | Check current Cloudflare terms |
| Authentication | ❌ | ✅ | Available through Cloudflare Access |
| Setup complexity | Simple | Simple | One-click in FlyEnv |
FlyEnv One-Click Setup (Recommended)
FlyEnv integrates Cloudflare Tunnel directly into the UI. No terminal commands, no configuration files—just point, click, and share.
Step 1: Get Your Cloudflare API Token
- Log in to Cloudflare Dashboard
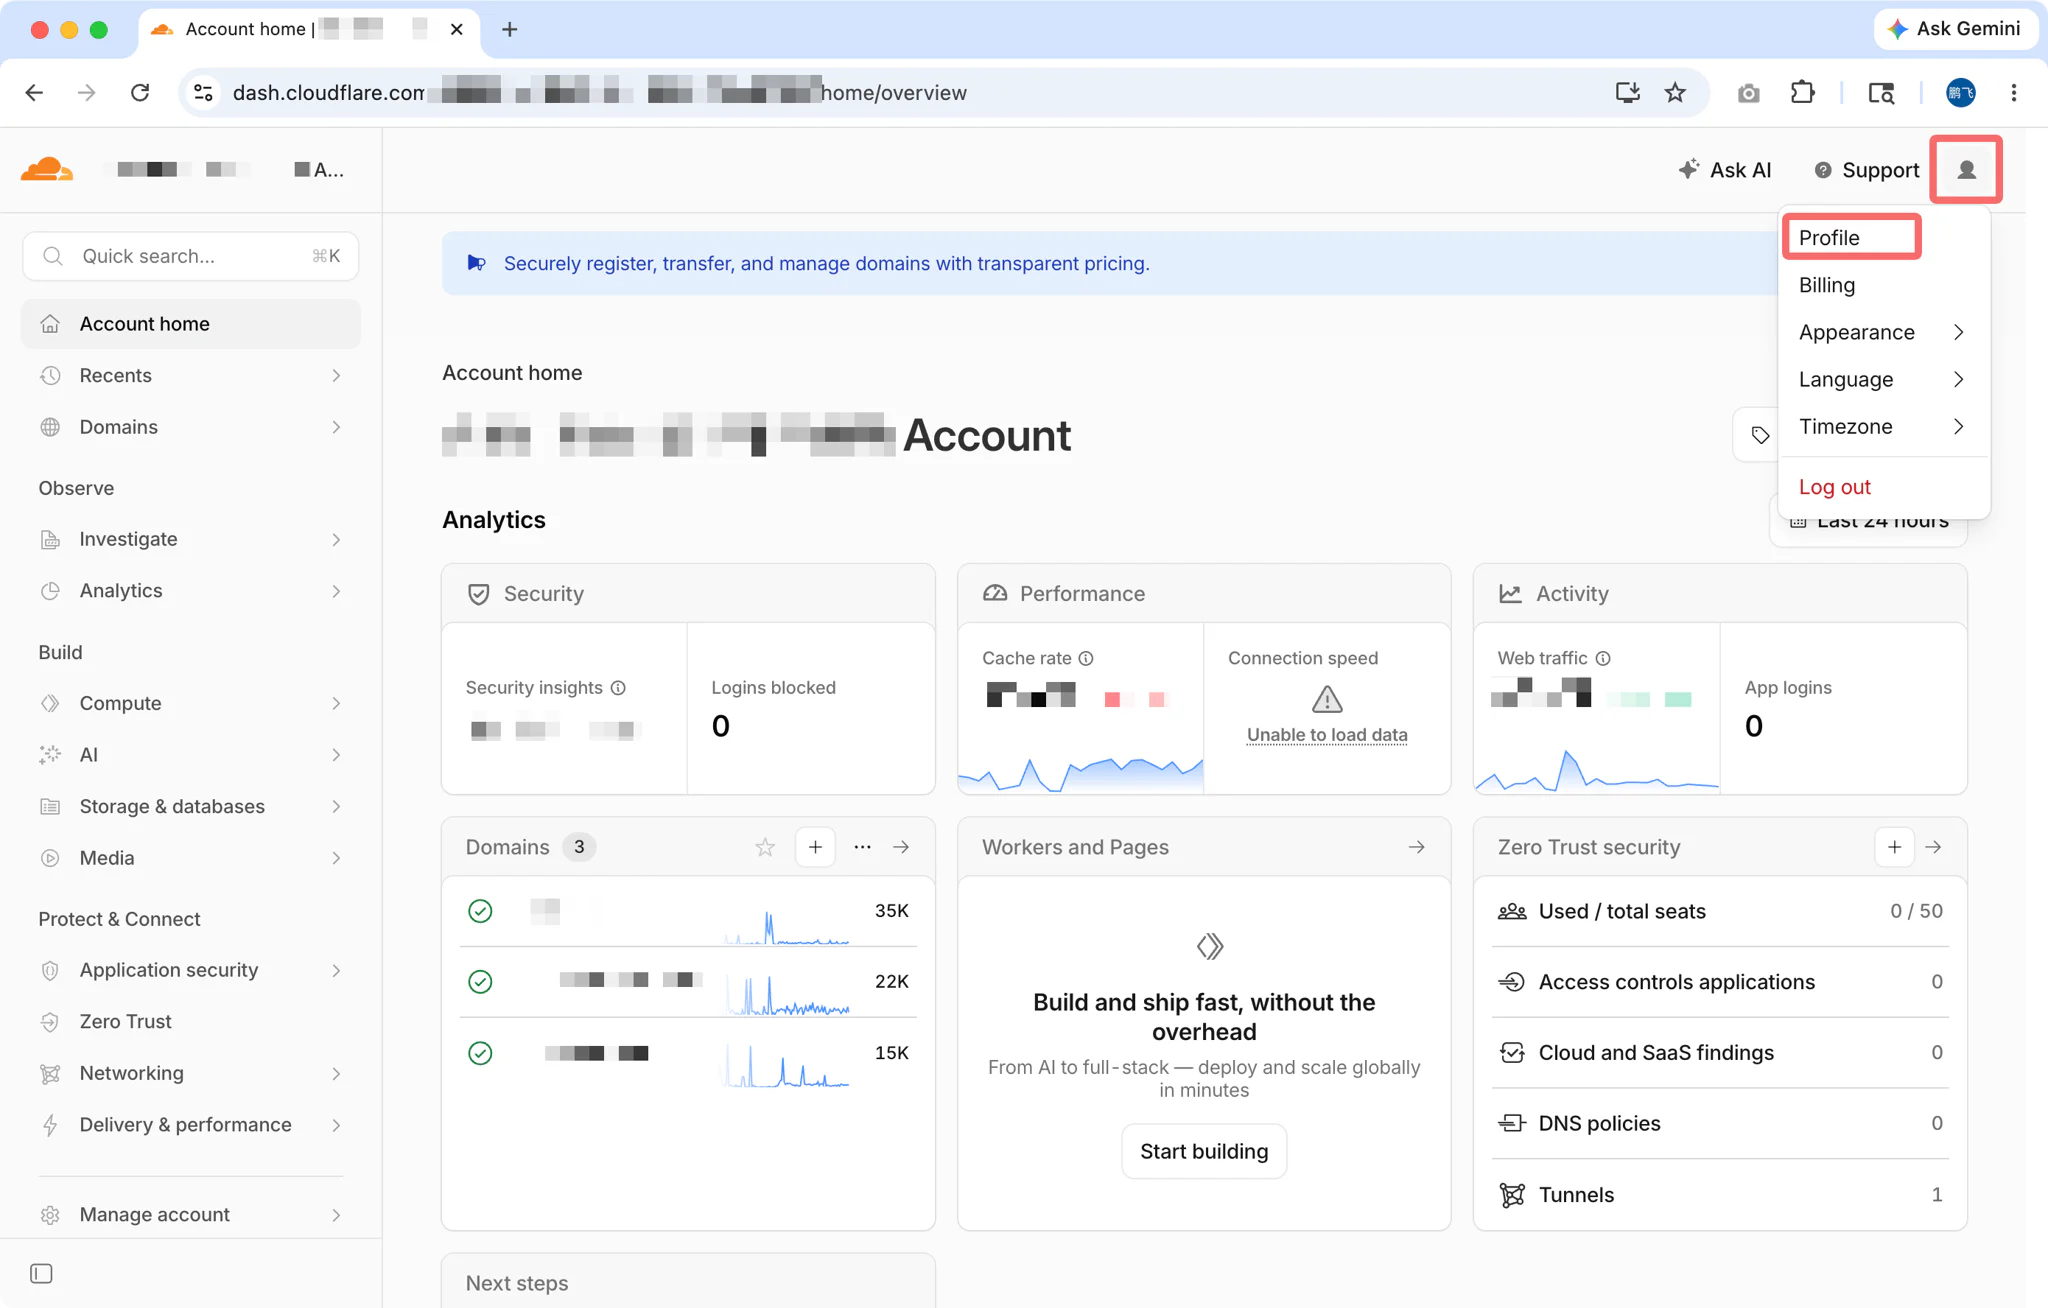
- Go to My Profile (top right) → API Tokens
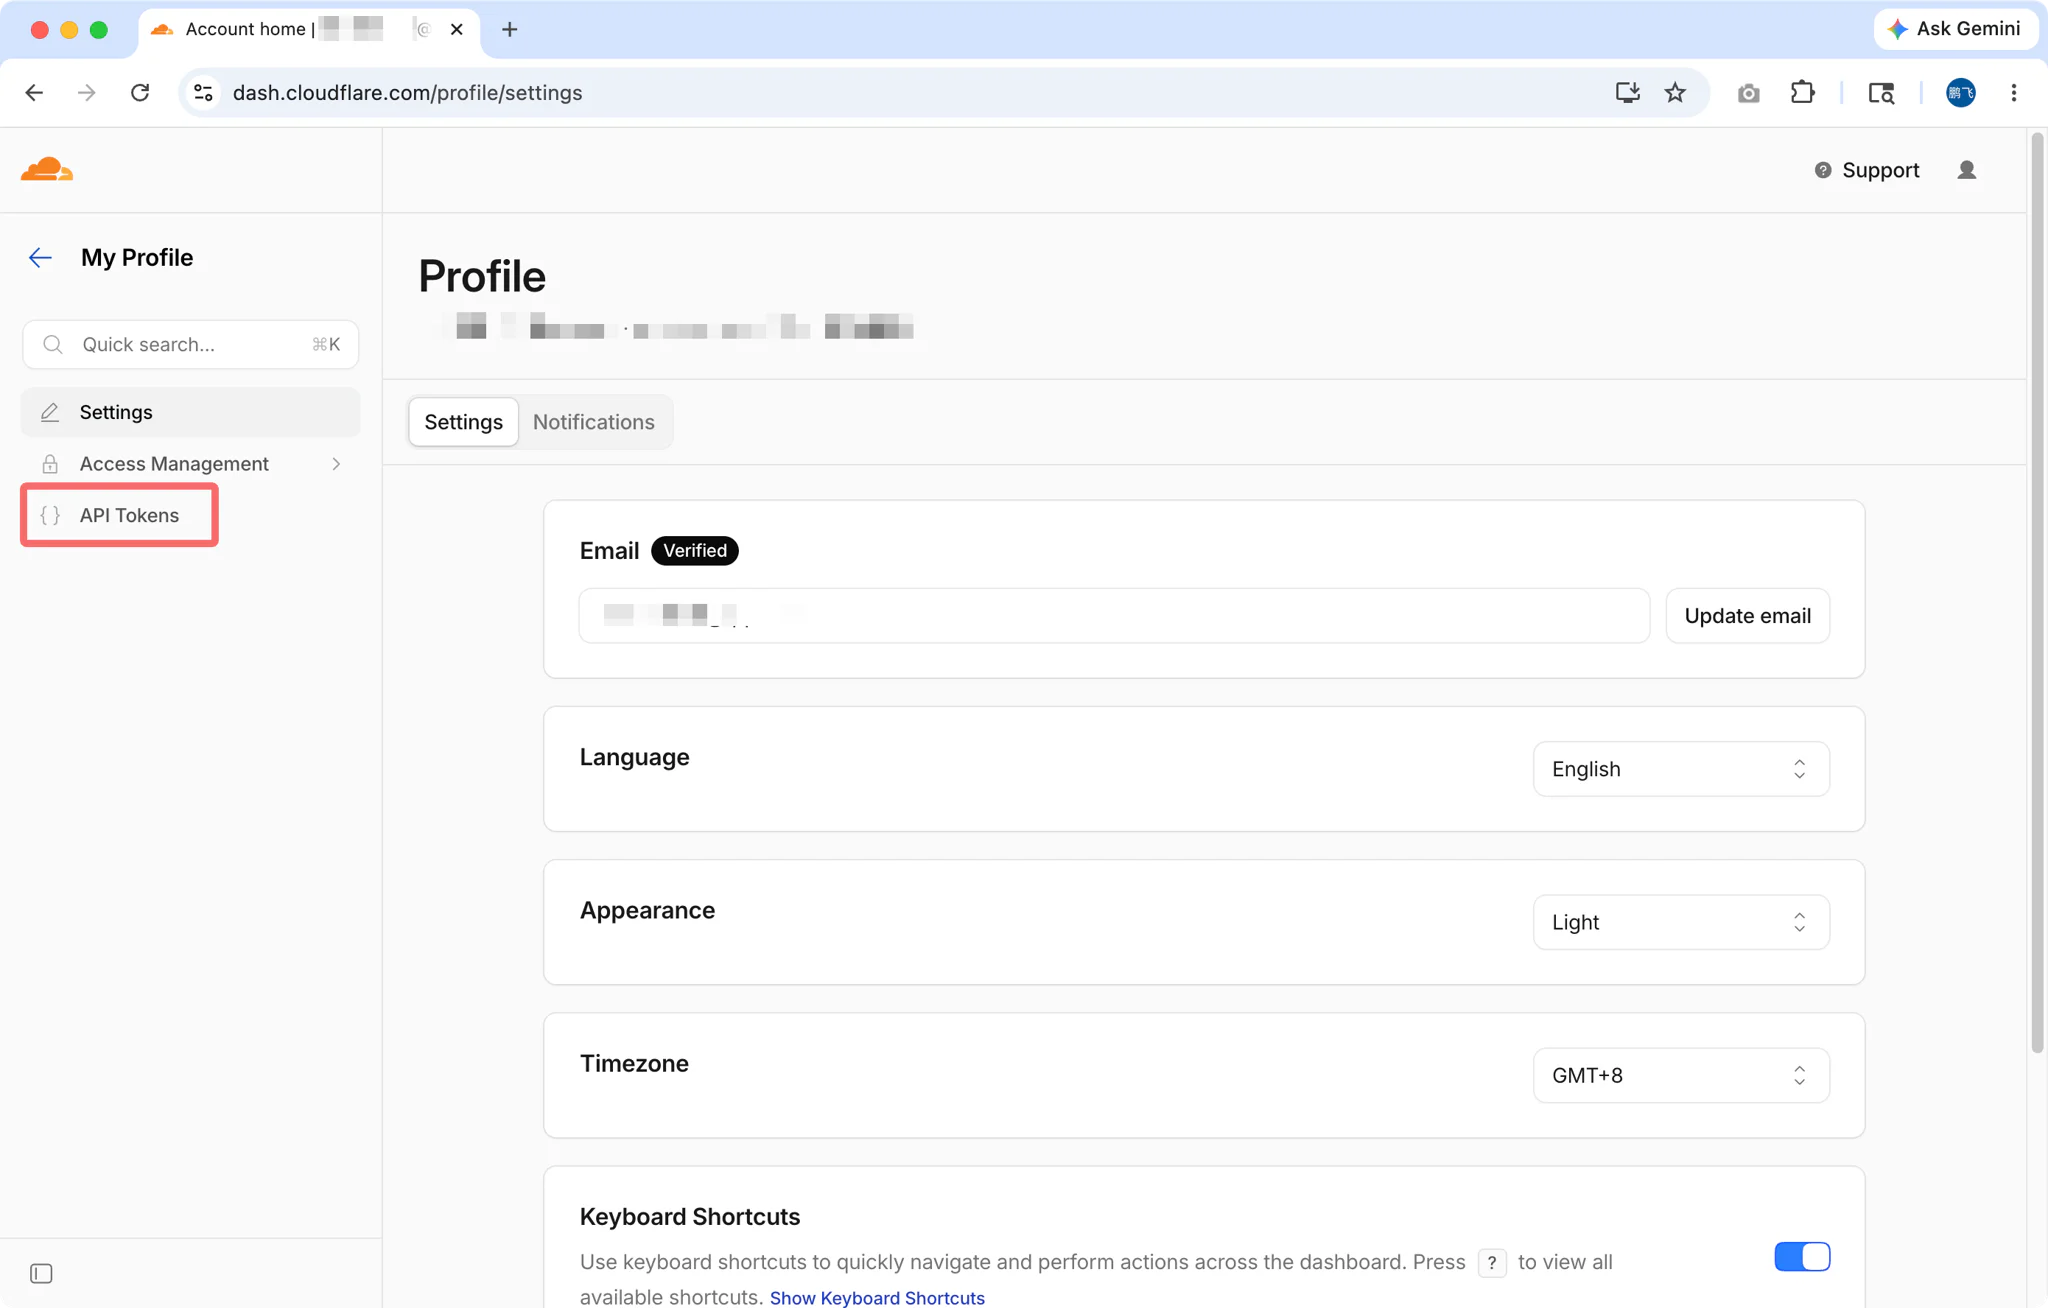
- Click Create Token
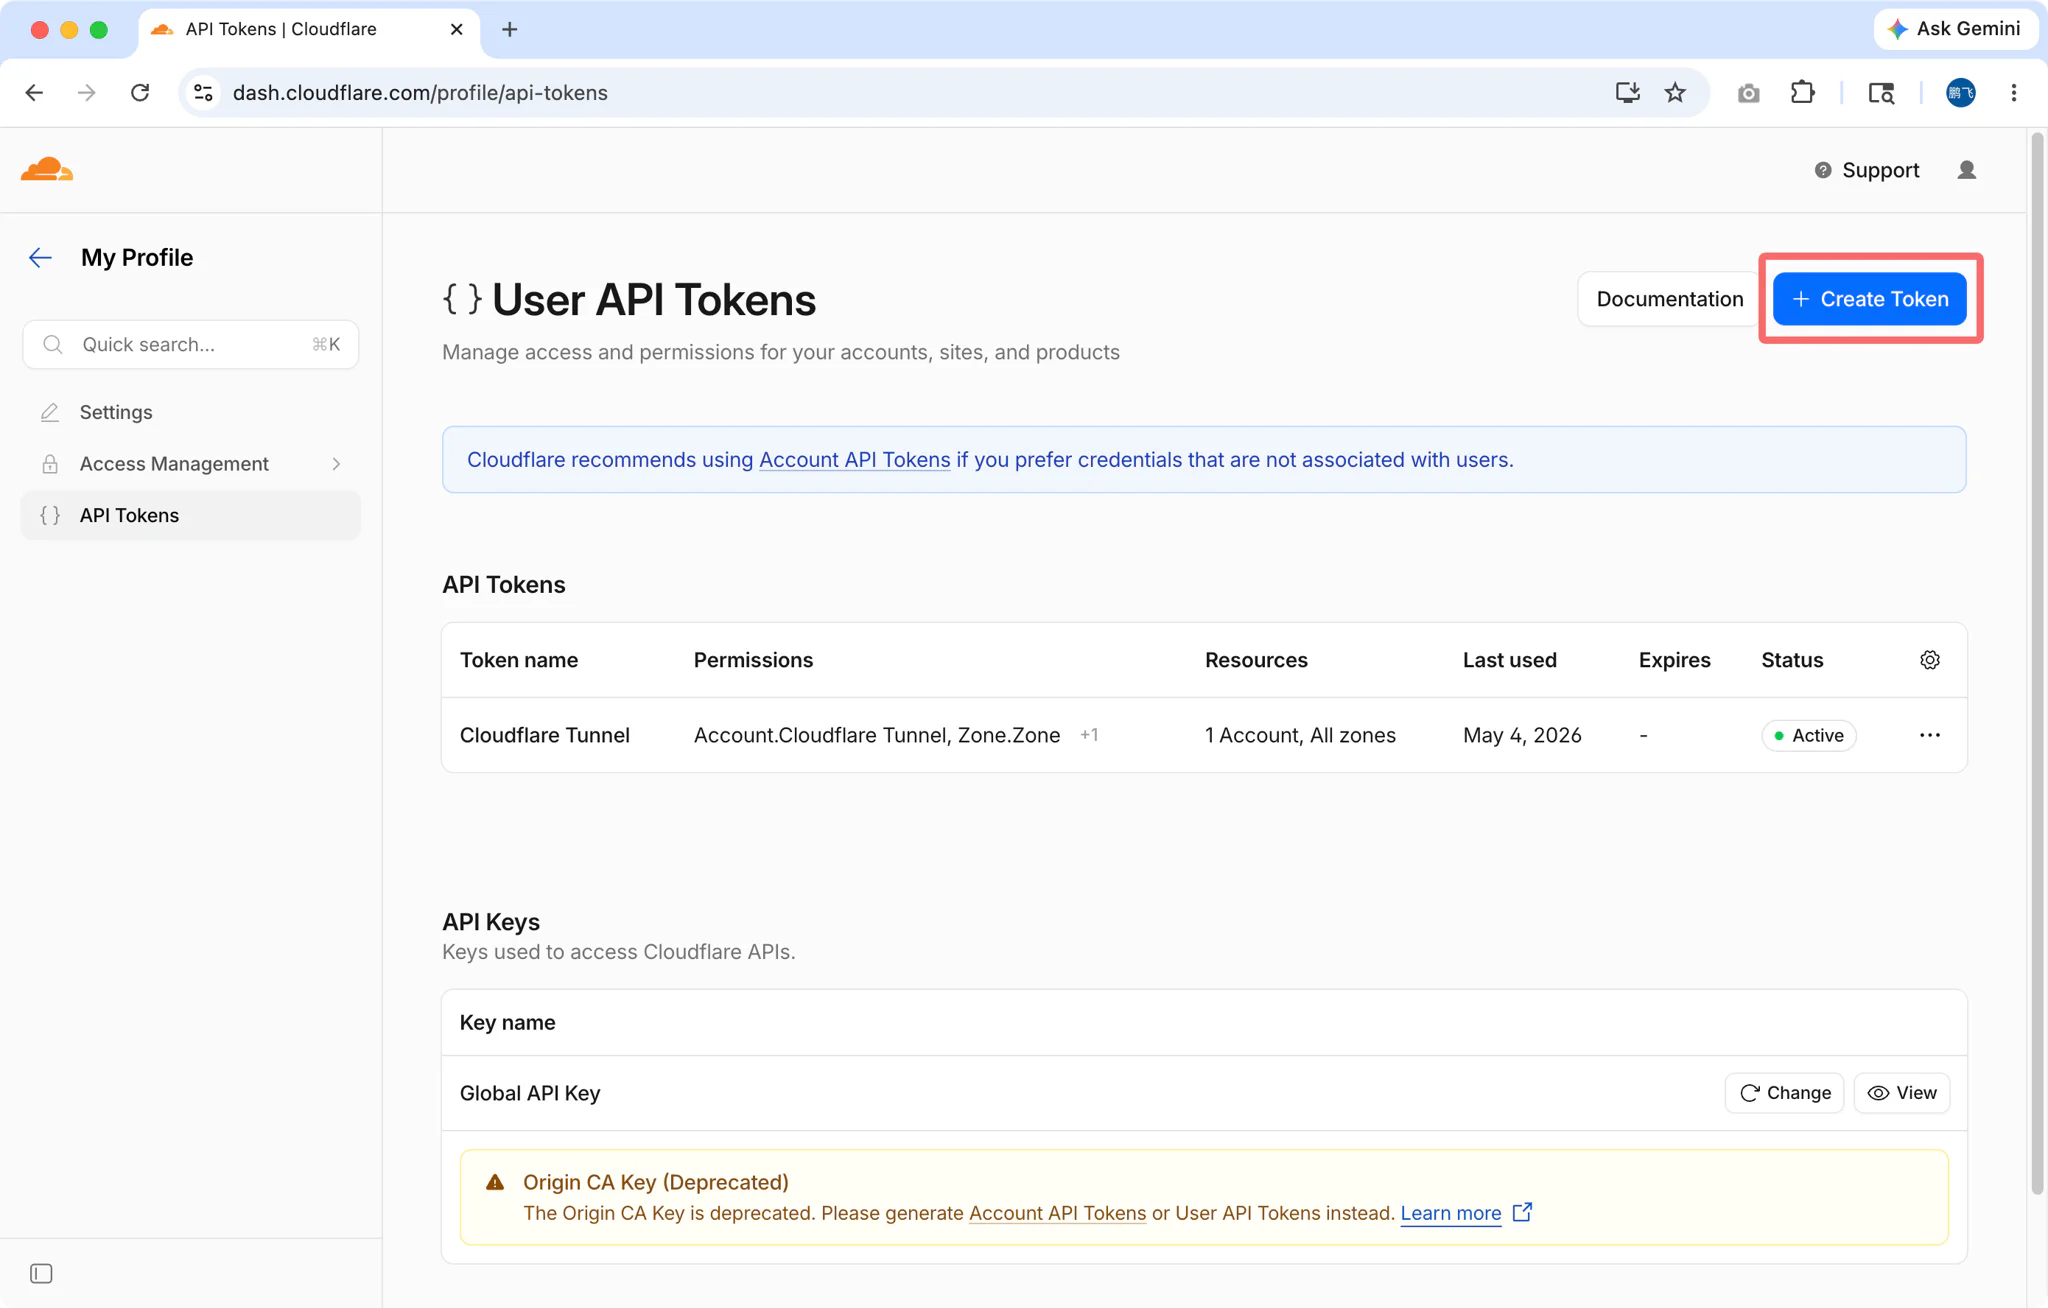
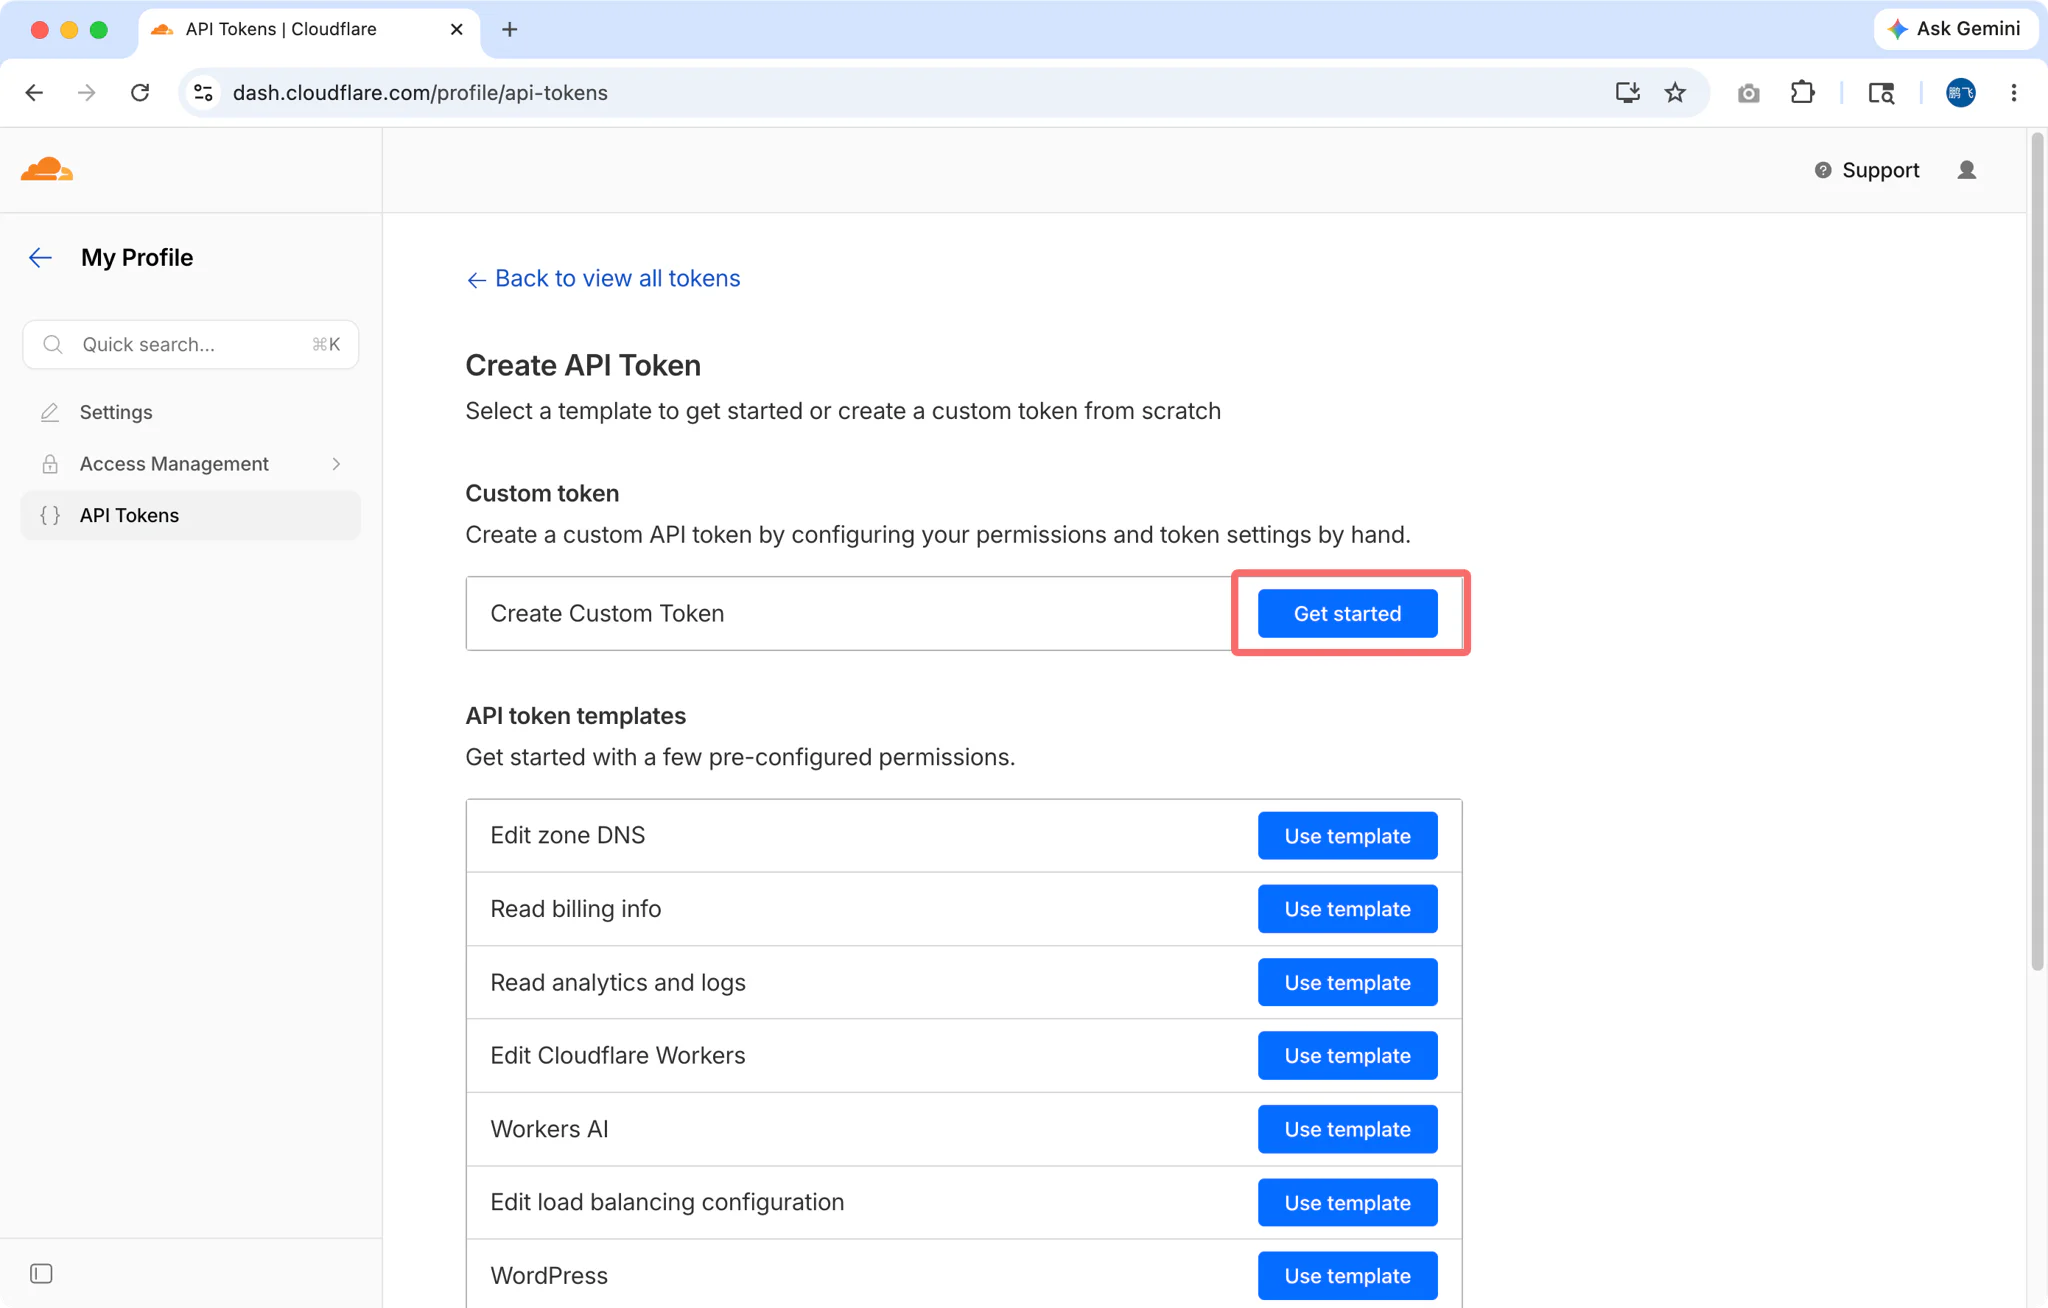
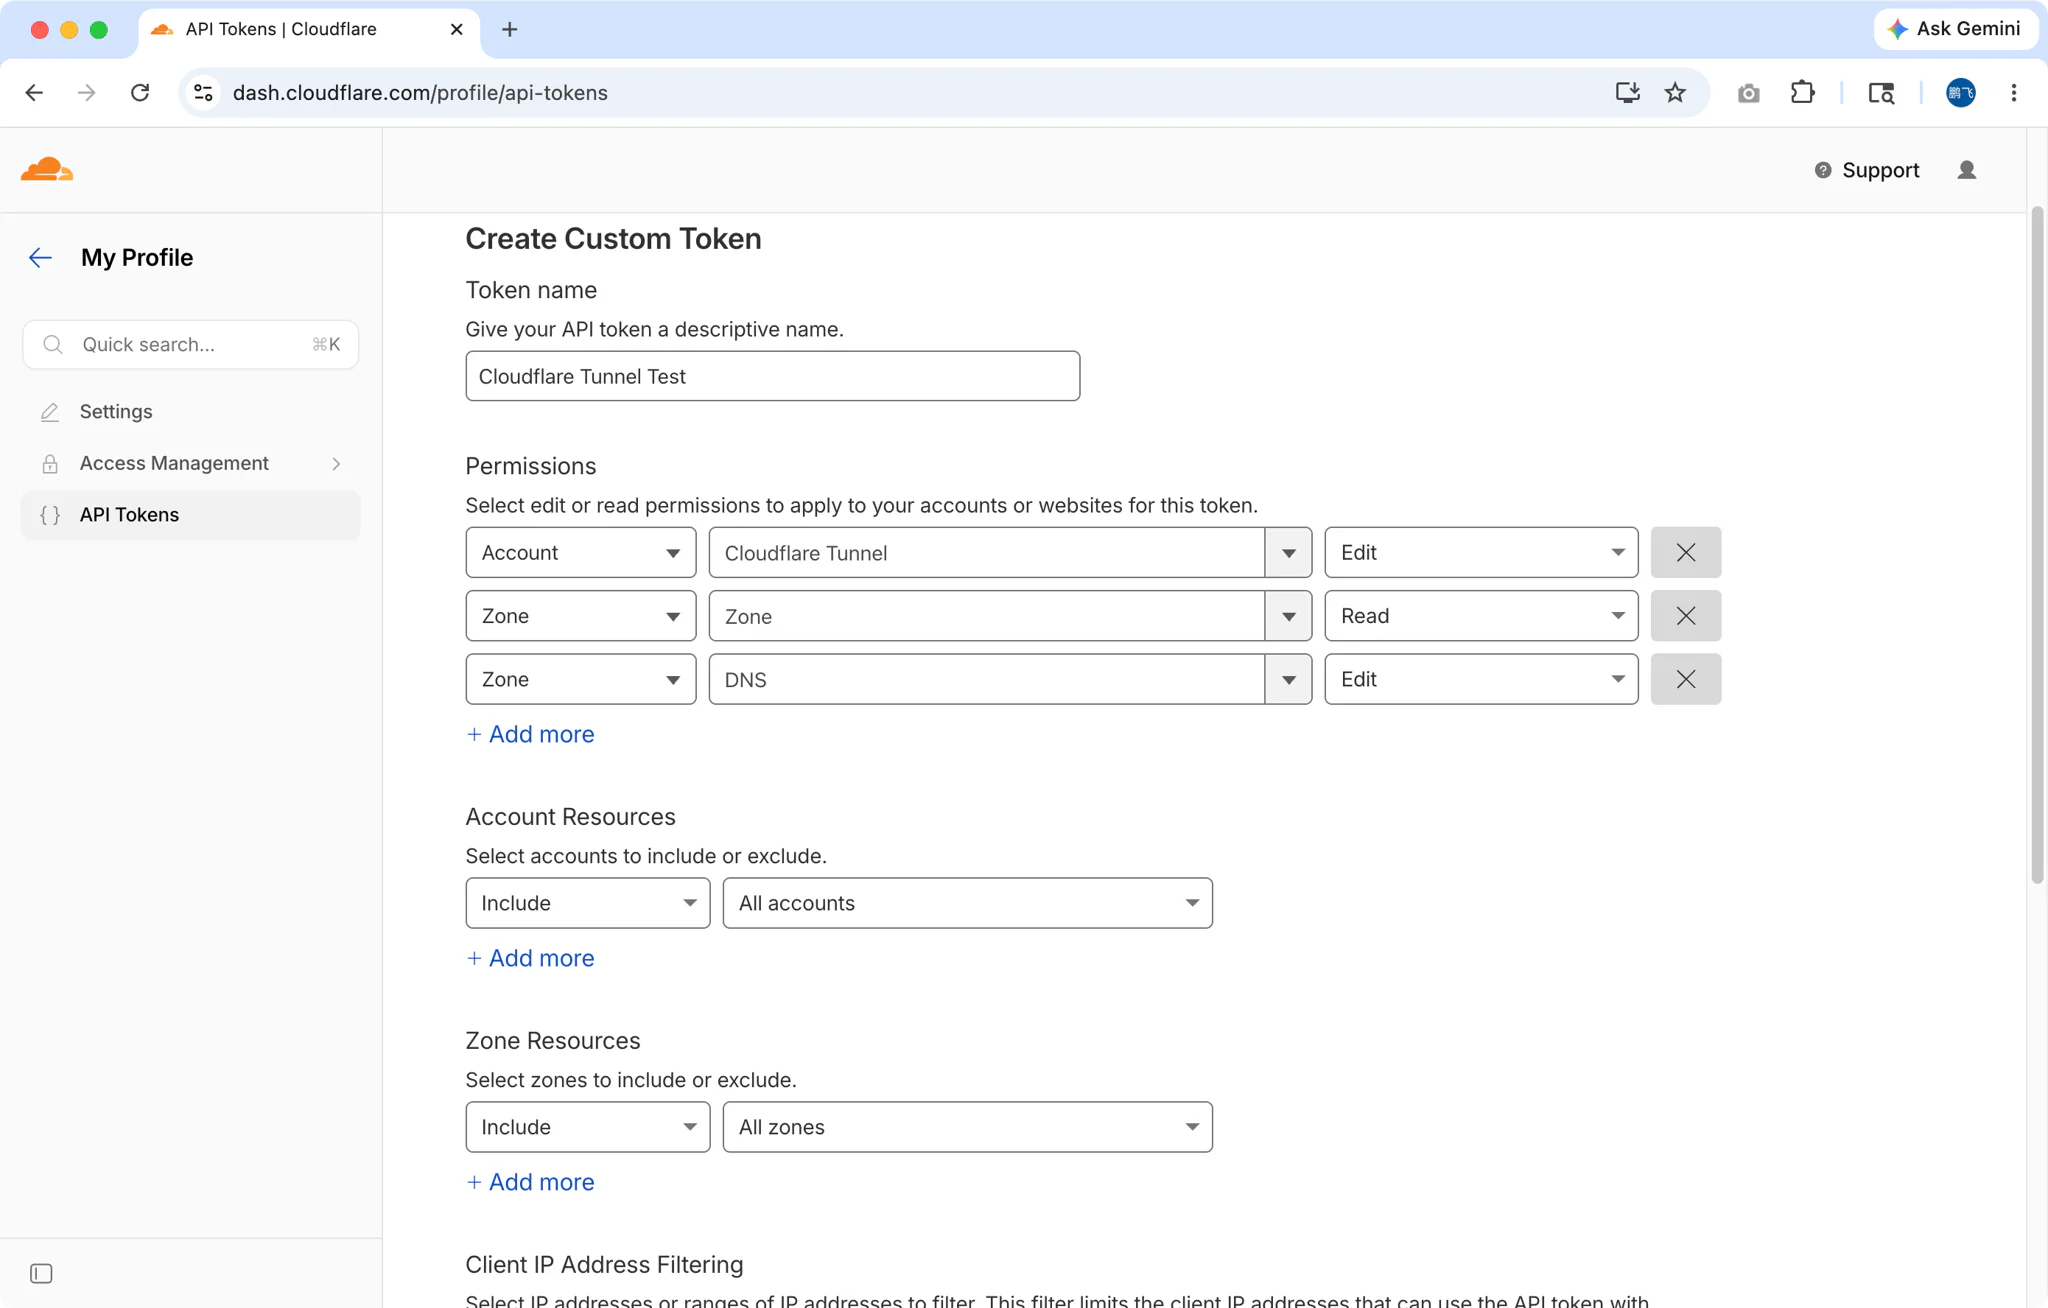
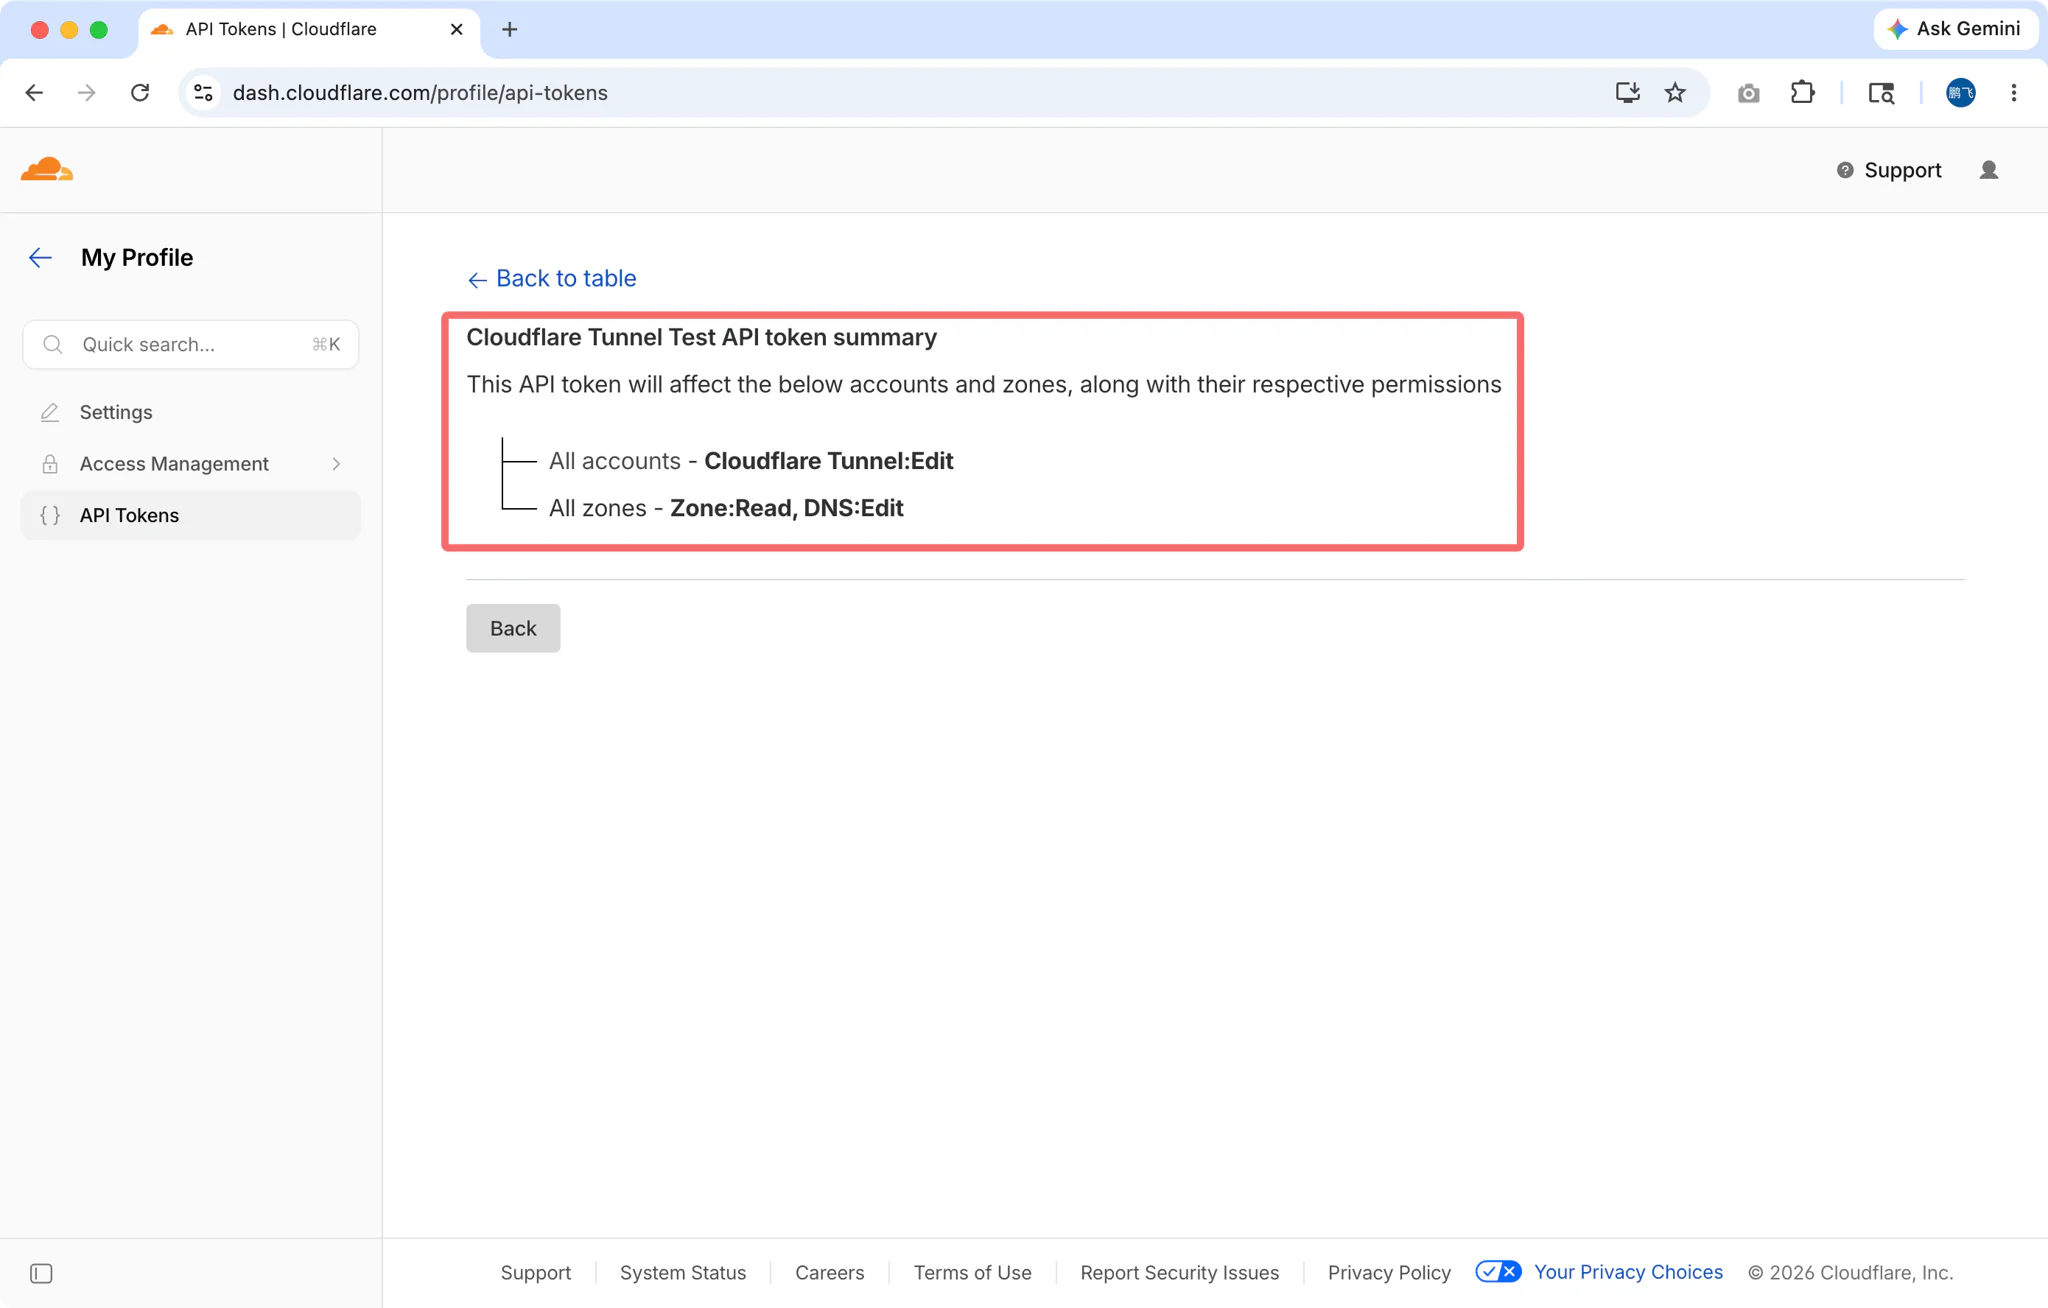
Use the "Cloudflare Tunnel" template, or create custom with these permissions:
- Account:Cloudflare Tunnel:Edit — For managing tunnels
- Zone:Zone:Read — For listing your domains
- Zone:DNS:Edit — For creating DNS records
Select the Zone Resources (domains) you want to use
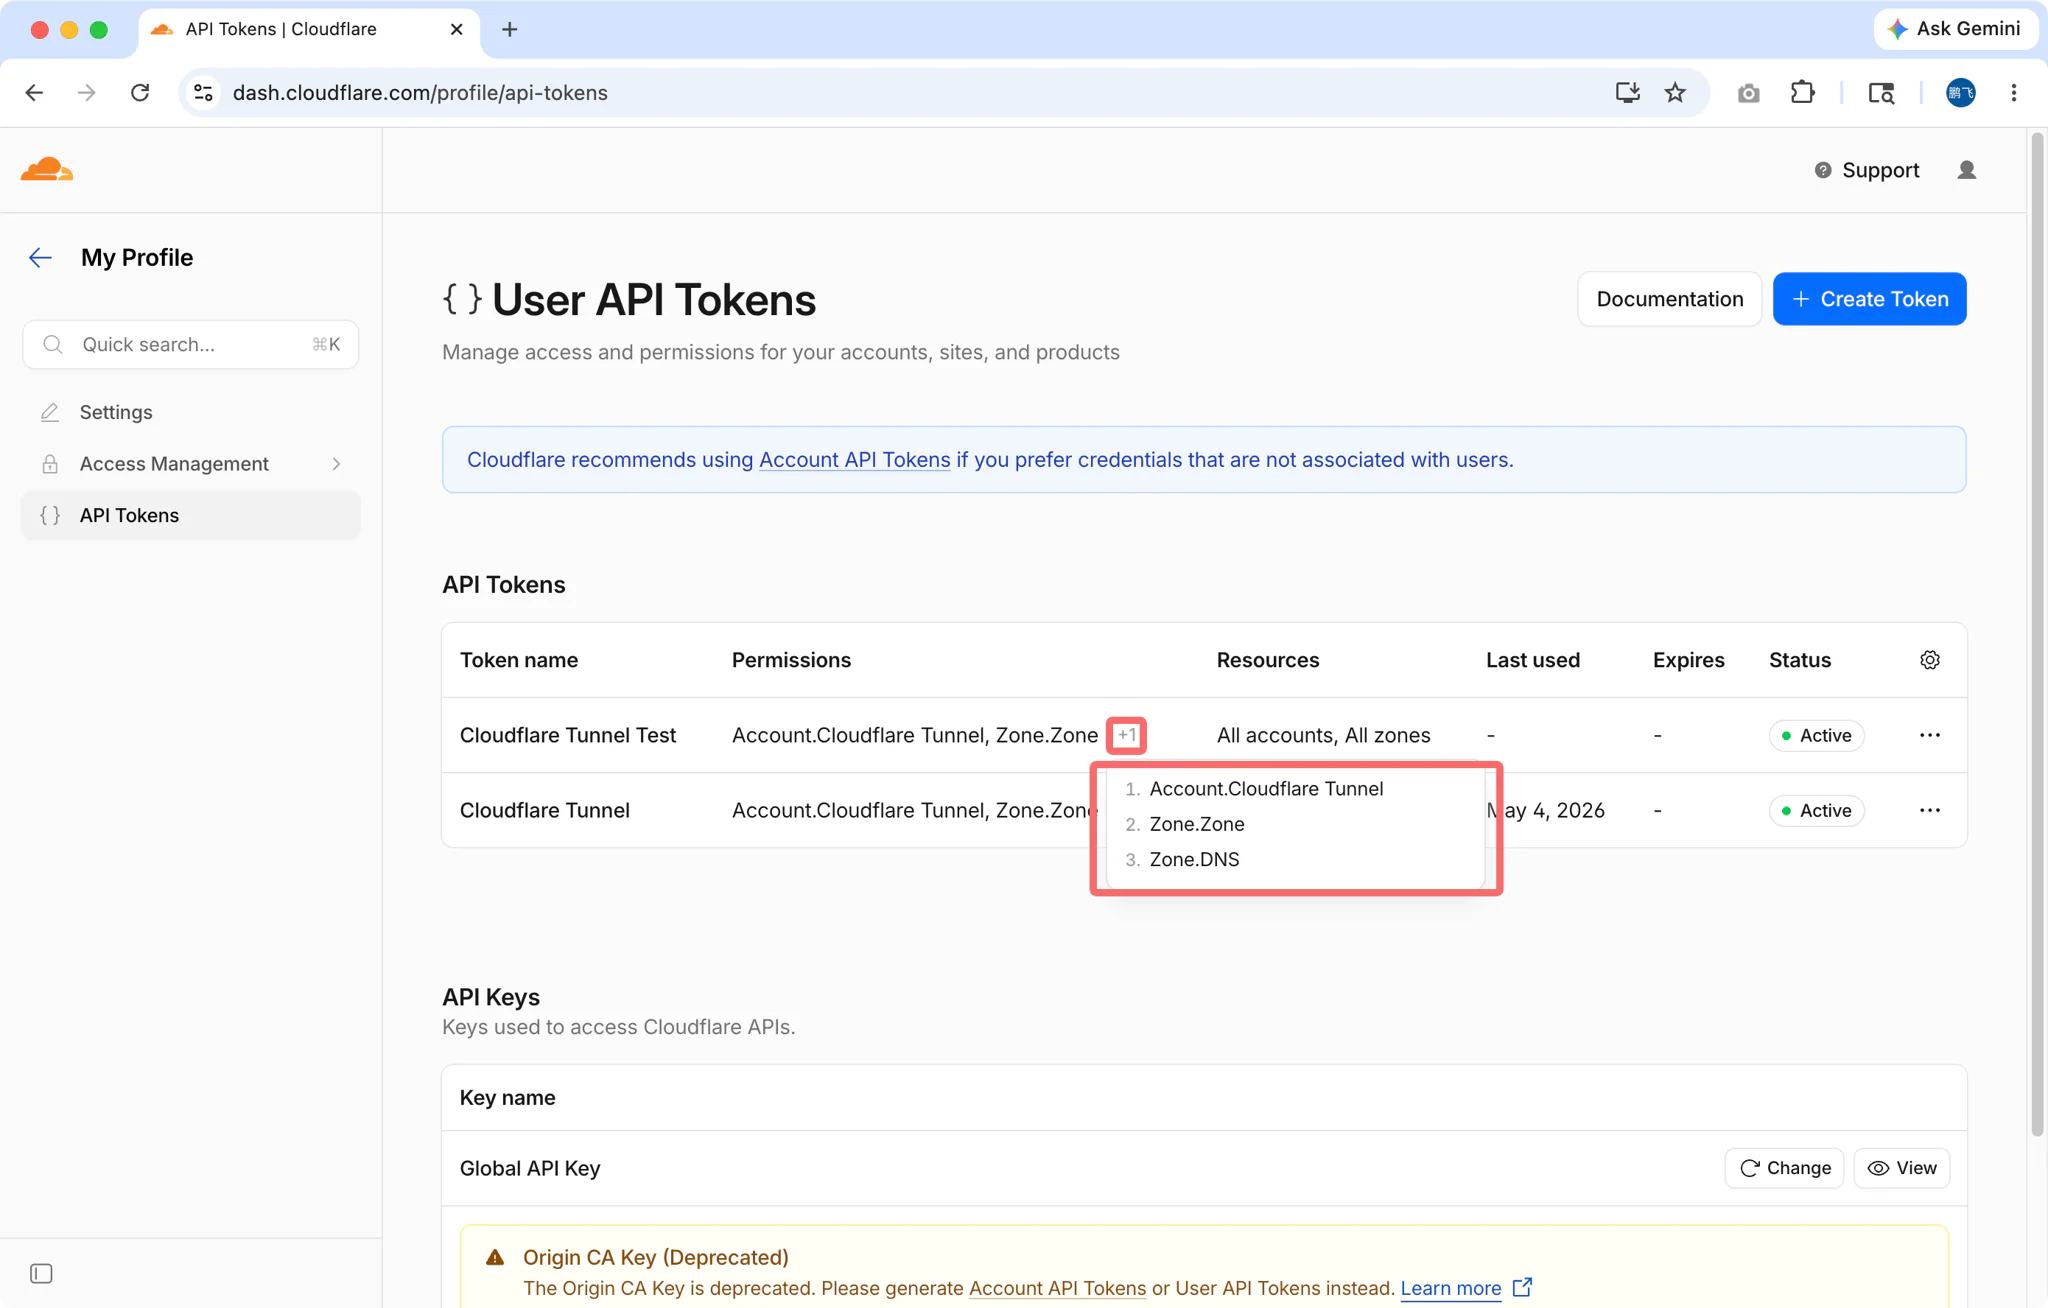
- Copy the generated token
Step 2: Configure in FlyEnv
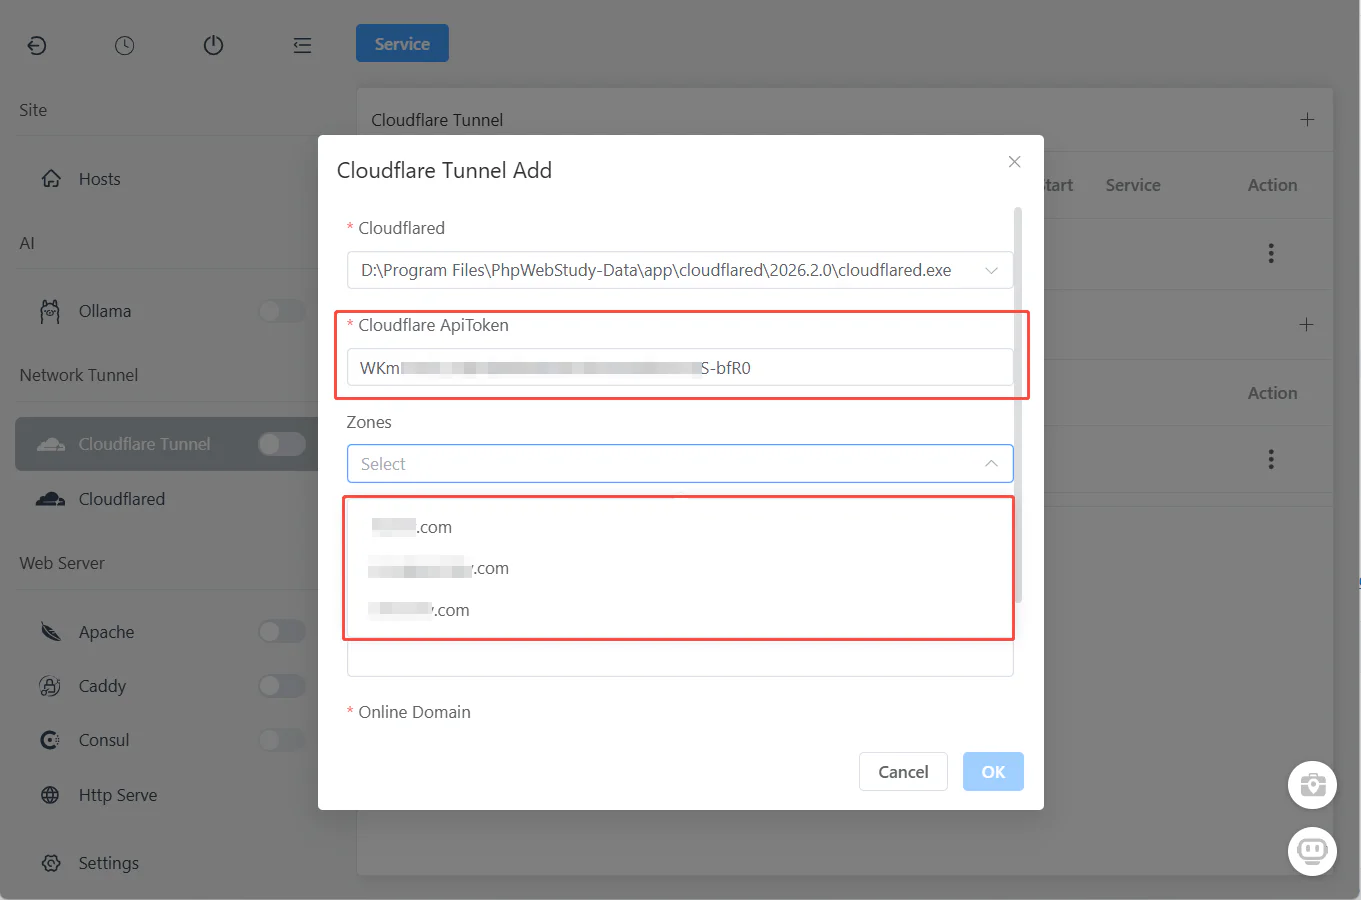
- Open FlyEnv → Cloudflare Tunnel module, and click Plus Icon Button
- Paste your API Token
- FlyEnv automatically fetches your available domains
Step 3: Create Your Tunnel
After zones are loaded:
- Select Zone: Choose the domain you want to use (e.g.,
yourdomain.com) - Set Subdomain: Enter your desired subdomain (e.g.,
dev→ createsdev.yourdomain.com) - Set Local URL: Choose your local development URL (e.g.,
http://localhost:3000orhttps://myproject.test) - Click "Ok"
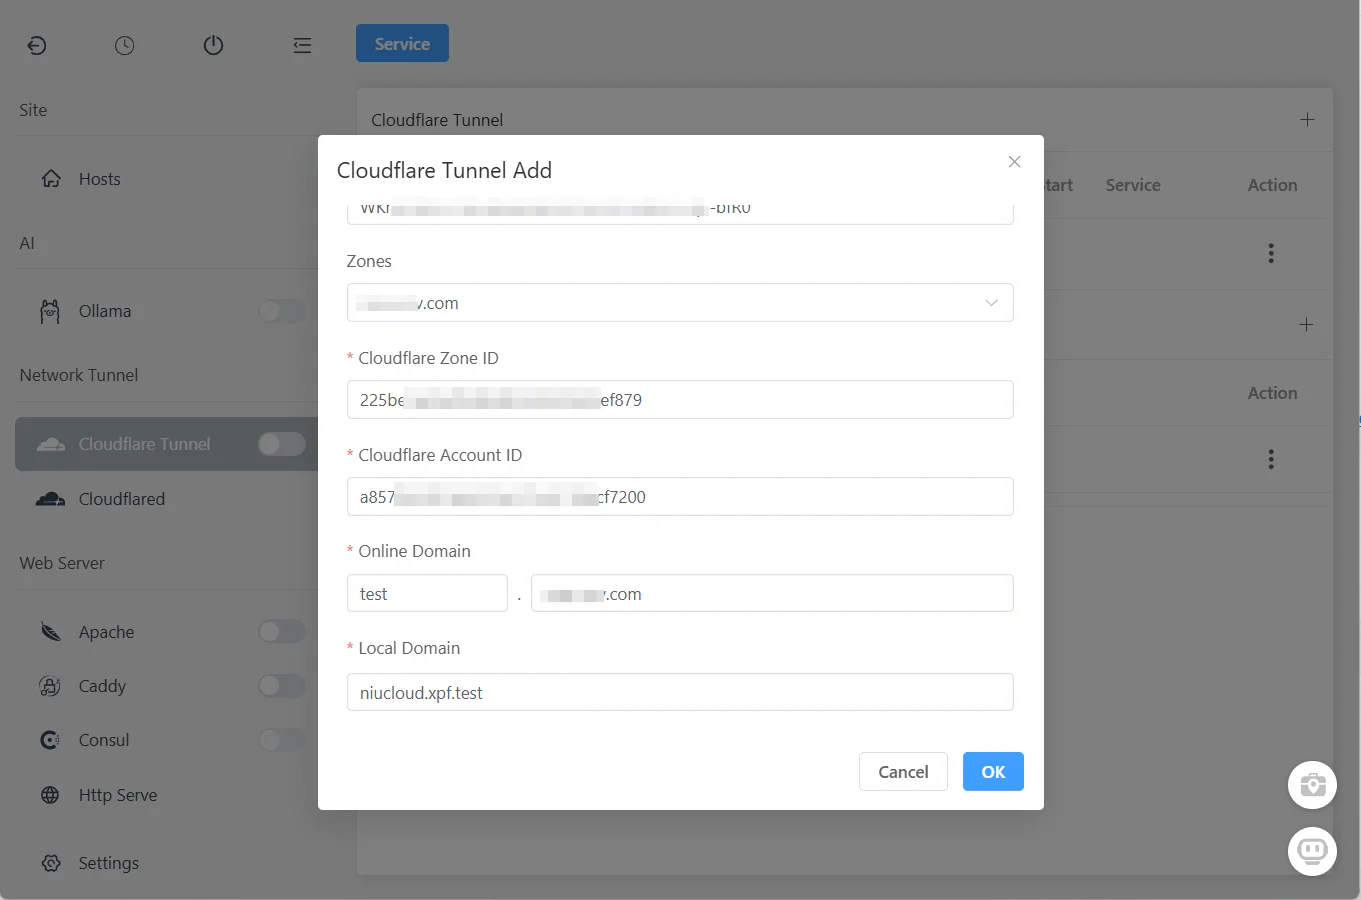
That's it! FlyEnv handles everything internally:
- ✅ Creates the Cloudflare Tunnel
- ✅ Configures DNS records
- ✅ Sets up routing rules
- ✅ Generates SSL certificates
Step 4: Start the Tunnel
Click the "Start" button in the Cloudflare Tunnel module.
Your local site is now live at https://dev.yourdomain.com
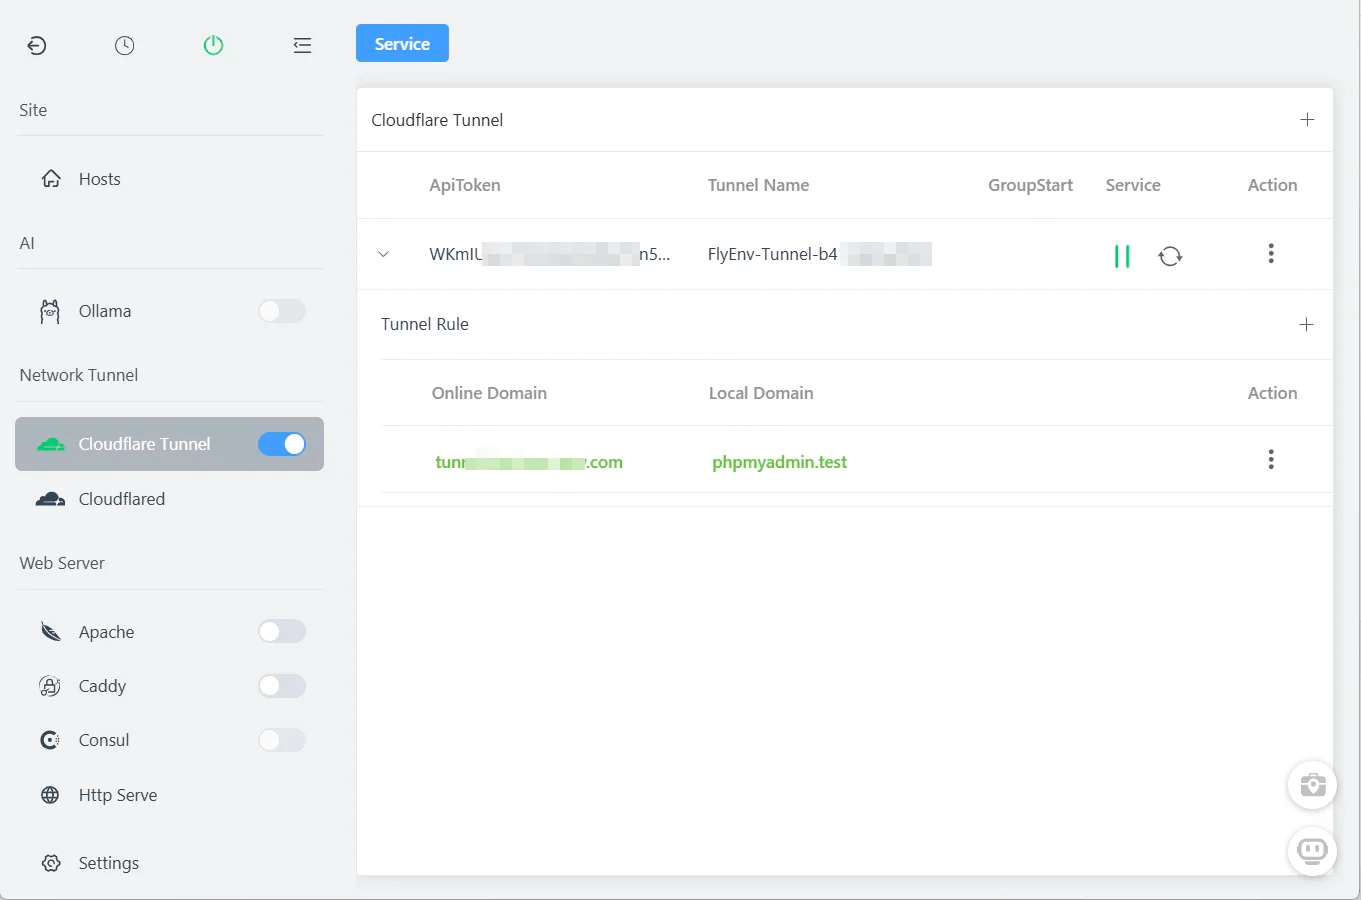
Managing Multiple Tunnels
Create as many tunnels as you need:
| Subdomain | Local URL | Purpose |
|---|---|---|
dev | https://myapp.test | Main development site |
api | http://localhost:3000 | API server |
admin | http://localhost:8080 | Admin dashboard |
client-a | https://client-a.test | Client preview |
All managed from one interface—start, stop, or delete tunnels with one click.
Manual Configuration (Command Line)
For advanced users who prefer command-line control, here's the traditional setup method:
Prerequisites
- A Cloudflare account with a plan that supports the features you need
- A domain added to Cloudflare
- Cloudflared installed (available in FlyEnv's Cloudflared module)
Step 1: Authenticate with Cloudflare
cloudflared tunnel loginThis opens a browser window to authorize Cloudflare access.
Step 2: Create Your Tunnel
# Create a named tunnel
cloudflared tunnel create dev-localhost

# Output will show your Tunnel ID
# Save this - you'll need it for configuration
Step 3: Configure DNS Route
# Route your subdomain to the tunnel
cloudflared tunnel route dns dev-localhost dev.yourdomain.com
Step 4: Create Configuration File
Create config.yml:
tunnel: <your-tunnel-id>
credentials-file: /Users/username/.cloudflared/<tunnel-id>.json

ingress:
  - hostname: dev.yourdomain.com
    service: http://localhost:80
  - hostname: api.yourdomain.com
    service: http://localhost:3000
  - service: http_status:404
Step 5: Start the Tunnel
cloudflared tunnel run dev-localhostComparison: FlyEnv's UI approach eliminates all these steps—you just enter API token, select zone, set subdomain, and click save.
Common Use Cases
1. Client Previews
Before: "Let me deploy to staging... (30 minutes later)"
After: Share https://feature-branch.yourdomain.com instantly—just create a tunnel and start it.
2. Webhook Development
Testing Stripe, GitHub, or Slack webhooks locally:
FlyEnv Setup:
- Create tunnel:
webhooks.yourdomain.com→http://localhost:3000/webhooks - Start tunnel
- Configure webhook endpoint in Stripe/GitHub dashboard
3. Mobile Device Testing
Test responsive designs on actual devices:
- iPhone accesses
https://mobile.yourdomain.com - Android accesses same URL
- Both hit your local development server
4. API Development with HTTPS
Some APIs require HTTPS callbacks. Cloudflare Tunnel provides:
- Automatic SSL certificates
- HTTPS termination at Cloudflare's edge
- Secure connection to your localhost
5. Team Collaboration
Share work-in-progress with teammates:
- Each developer creates their own tunnel
- Or use one shared tunnel pointing to a team server
Troubleshooting
"Cannot get zones" in FlyEnv
Cause: Invalid API Token or insufficient permissions
Solution:
- Verify token has these permissions: Zone:Read, DNS:Edit, Cloudflare Tunnel:Edit
- Ensure token includes the zone you want to use
- Try creating a new token with the "Cloudflare Tunnel" template
"Tunnel creation failed"
Cause: Network issues or duplicate tunnel name
Solution:
- Check internet connection
- Try a different subdomain
- Check if tunnel already exists in Cloudflare dashboard
"Tunnel started but site not accessible"
Cause: Local URL incorrect or local service not running
Solution:
- Verify local URL in tunnel settings (e.g.,
http://localhost:3000) - Ensure your local development server is actually running
- Try accessing the local URL directly in browser first
DNS Not Propagating
Cause: Cloudflare DNS caching
Solution:
- Wait 1-5 minutes after creating tunnel
- Check DNS records in Cloudflare dashboard
- Ensure orange cloud is enabled (proxied)
Advanced Configuration
Authentication (Zero Trust)
Add Google/GitHub login to your tunnel:
- In Cloudflare Zero Trust Dashboard
- Go to Access → Applications
- Create new application for your subdomain
- Configure authentication providers
- Apply to your tunnel hostname
Now dev.yourdomain.com requires login before showing your local site.
Load Balancing (Multiple Tunnels)
For high-availability during demos:
# config.yml - Manual configuration example
# On Machine A
tunnel: tunnel-id-1
# On Machine B
tunnel: tunnel-id-2

# Both route to same hostname
# Cloudflare load balances between them
Note: For most development use cases, a single tunnel is sufficient.
Comparison: FlyEnv vs Manual Setup
| Aspect | Manual (Command Line) | FlyEnv UI |
|---|---|---|
| Setup time | 15-30 minutes | 2 minutes |
| Commands to remember | 10+ | 0 |
| Configuration files | Multiple YAML files | None |
| Tunnel management | Terminal commands | Point and click |
| Multiple tunnels | Complex | Easy |
| Start/stop | cloudflared tunnel run | One button |
Frequently Asked Questions (FAQ)
Q: Is Cloudflare Tunnel really free?
A: Cloudflare offers a free plan that can be sufficient for many development tunnels. Limits and included Access features can change, so check Cloudflare's current plan documentation before relying on a feature.
Q: Do I need a paid Cloudflare plan?
A: Not necessarily. Many local preview workflows work on the free plan, but requirements depend on the hostname, Access policies, usage, and current Cloudflare terms.
Q: Can I use any domain?
A: You need to control the domain's DNS (add it to Cloudflare). Free domains work, or use a subdomain of a domain you own.
Q: How secure is this?
A: The connector initiates an outbound connection, so you do not need to open an inbound router port. The public hostname is still internet-accessible unless you add suitable Cloudflare Access policies, application authentication, and origin controls.
Q: Will this slow down my local development?
A: Minimal impact. The tunnel adds ~50-100ms latency—acceptable for previews and webhooks. For local development, you still use localhost directly.
Q: What about WebSockets?
A: Cloudflare Tunnel supports WebSockets, but application behavior still depends on your origin, proxy settings, and Cloudflare plan.
Q: Can I use the same tunnel on multiple machines?
A: No—each tunnel is tied to one machine. Create separate tunnels for different machines or developers.
Q: What happens when I stop the tunnel?
A: The public URL becomes inaccessible, but DNS records remain. When you restart the tunnel (even days later), the same URL works again.
Q: Can I share tunnels with team members?
A: Team members can create their own tunnels pointing to their local machines. For shared environments, consider deploying to a staging server instead.
Q: Do I need to keep FlyEnv running?
A: Yes. The tunnel runs through FlyEnv's Cloudflare Tunnel module. Closing FlyEnv stops the tunnel.
Ready to Ditch ngrok?
Cloudflare Tunnel integrated with FlyEnv provides a convenient UI for configuring public hostnames for local development.
Download FlyEnv to get started with built-in Cloudflare Tunnel support.
Want to explore more networking features? Check out our guide on Reverse Proxy Setup or Custom Domains & Auto SSL.