Custom Domains & Auto SSL for Local Development: Complete Guide
Accessing your project at http://localhost:8080/myproject is embarrassing when sharing with clients. Professional developers use clean domains like https://clientproject.test—with valid SSL certificates that browsers trust.
This guide shows you how to set up custom local domains with automatic HTTPS, making your development environment indistinguishable from production.
Why Custom Domains Matter
The Problem with localhost:port URLs
❌ http://localhost:3000
❌ http://127.0.0.1:8080/project
❌ http://192.168.1.50:9000
Issues:
- Hard to remember
- Port numbers in URLs
- Cookie conflicts between projects
- CORS issues when testing APIs
- No HTTPS for testing secure features
The Professional Approach
✅ https://myapp.test
✅ https://api.myapp.test
✅ https://admin.myapp.test
Benefits:
- Clean, memorable URLs
- Per-project cookies and storage
- Proper HTTPS testing
- Subdomain-based routing
- Production-parity configuration
How Local Domains Work
FlyEnv uses the Hosts file (system-level DNS override) to map domains to your local machine:
# /etc/hosts (macOS/Linux) or C:\Windows\System32\drivers\etc\hosts
127.0.0.1  myproject.test
127.0.0.1  api.myproject.test
Combined with a local web server, this creates a complete local hosting environment.
Creating Your First Custom Domain Site
Step 1: Choose a Domain Name
Recommended TLDs for local development:
.test— IETF reserved for testing (recommended).local— Common but can conflict with mDNS on macOS.localhost— Explicitly non-routable.invalid— Another reserved option
Avoid:
.dev— Owned by Google, forces HTTPS in Chrome- Real TLDs (.com, .io) — May conflict with actual sites
Good examples:
laravel-project.testclient-site.testapi.myapp.testwordpress.test
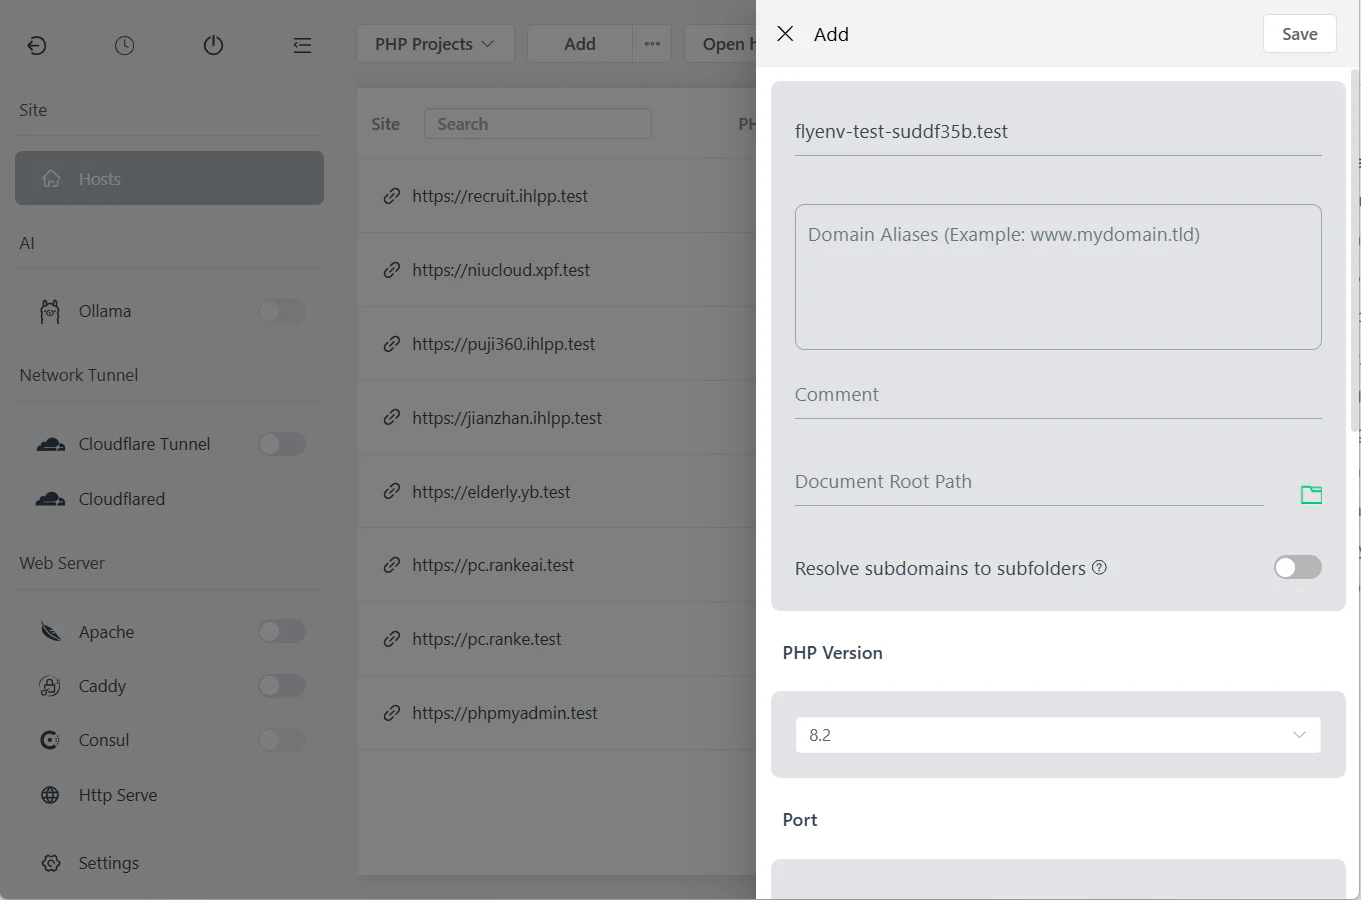
Step 2: Create Site in FlyEnv
- Open Host module
- Click "Add Site"
- Configure:
- Host Name:
myproject.test - Host Root:
/Users/you/code/myproject/public - PHP Version: Select installed version
- Port: 80 (HTTP default)
- Host Name:
Step 3: Configure Project Root
The root path depends on your framework:
| Framework | Root Directory |
|---|---|
| Laravel | /project/public |
| WordPress | /project (contains wp-config.php) |
| Symfony | /project/public |
| Yii2 | /project/web |
| Plain PHP | /project (where index.php lives) |
| Static HTML | /project (where index.html lives) |
Important: Set correct permissions:
- Owner: Your user account
- Group: Web server user (www-data, _www, etc.)
- Permissions: 755 for directories, 644 for files
Step 4: Enable Auto SSL
SSL is essential for testing:
- Service Workers require HTTPS
- Secure cookies only work over HTTPS
- WebRTC requires HTTPS
- Modern APIs (Geolocation, Camera) require HTTPS
Enable in FlyEnv:
- In site settings, check "Use SSL"
- Select "Auto SSL" (recommended)
- Click Save
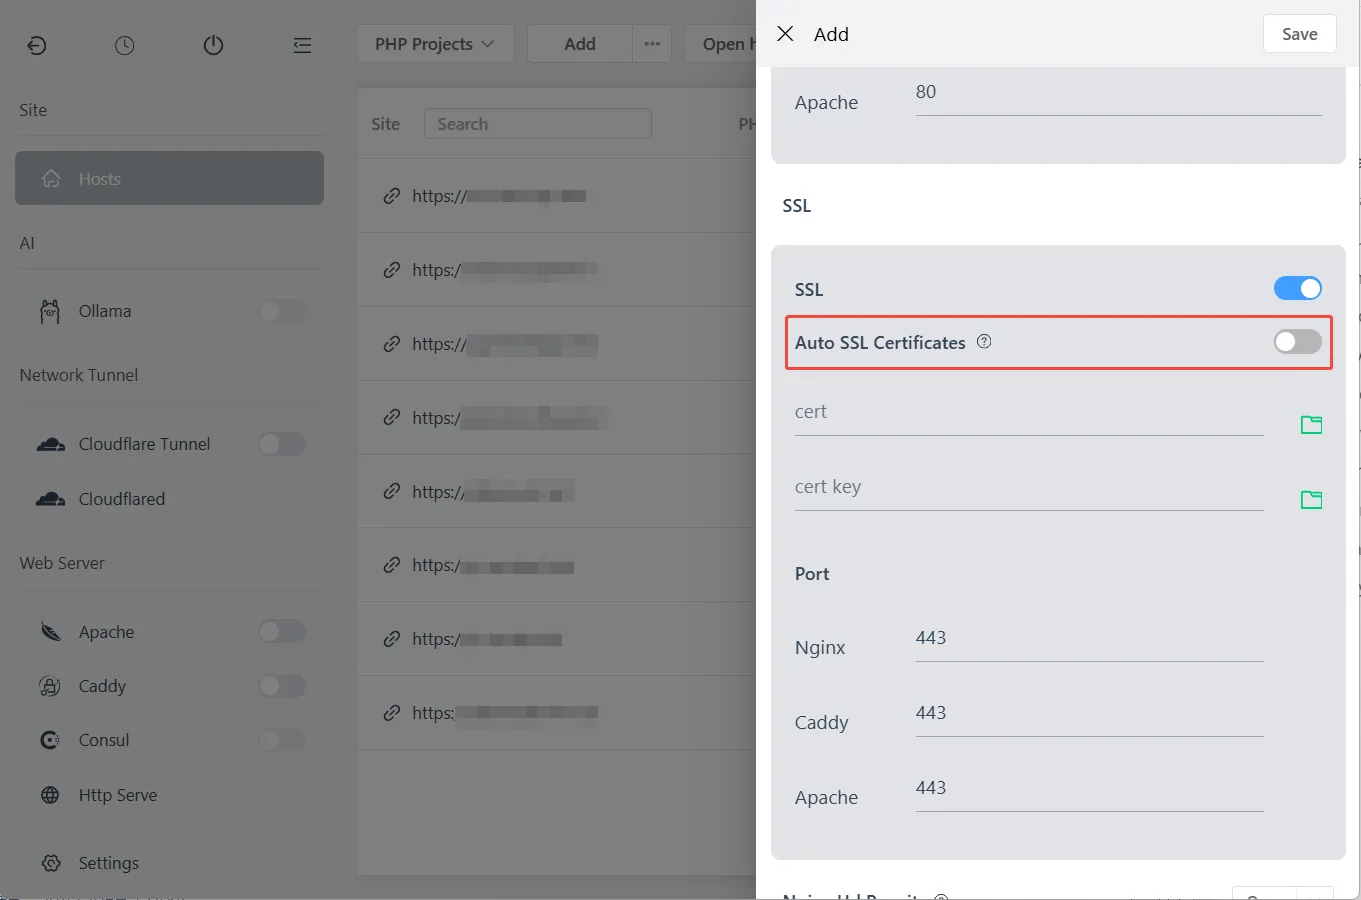
What happens:
- FlyEnv generates a local CA certificate
- Creates site-specific certificate signed by CA
- Adds CA to system trust store
- Configures web server for HTTPS
Note for Linux: Browsers may require manual CA import. FlyEnv provides the certificate file path.
Step 5: Start Services and Test
- Start your web server (Nginx/Apache/Caddy)
- Start PHP-FPM (if using PHP)
- Open
https://myproject.testin browser
You should see a green lock icon—no browser warnings.
Site Configuration Options
Port Configuration
Standard ports:
- Port 80 — HTTP (no port in URL)
- Port 443 — HTTPS (no port in URL)
- Custom ports —
http://site.test:8080
When to use custom ports:
- Running multiple web servers
- Avoiding conflicts with system services
- Testing specific port scenarios
Host Aliases
Add multiple domains pointing to the same site:
Primary: myproject.test
Alias: www.myproject.test
Alias: alternate.test
All aliases share the same SSL certificate automatically.
Subdomain Auto-Discovery (Park Feature)
The Park feature auto-creates subdomains from folder names:
Root: /Users/you/projects/myapp
Subdirectories:
  - /api -> api.myapp.test
  - /admin -> admin.myapp.test
  - /docs -> docs.myapp.test
Enable in site settings by checking "Park" option.
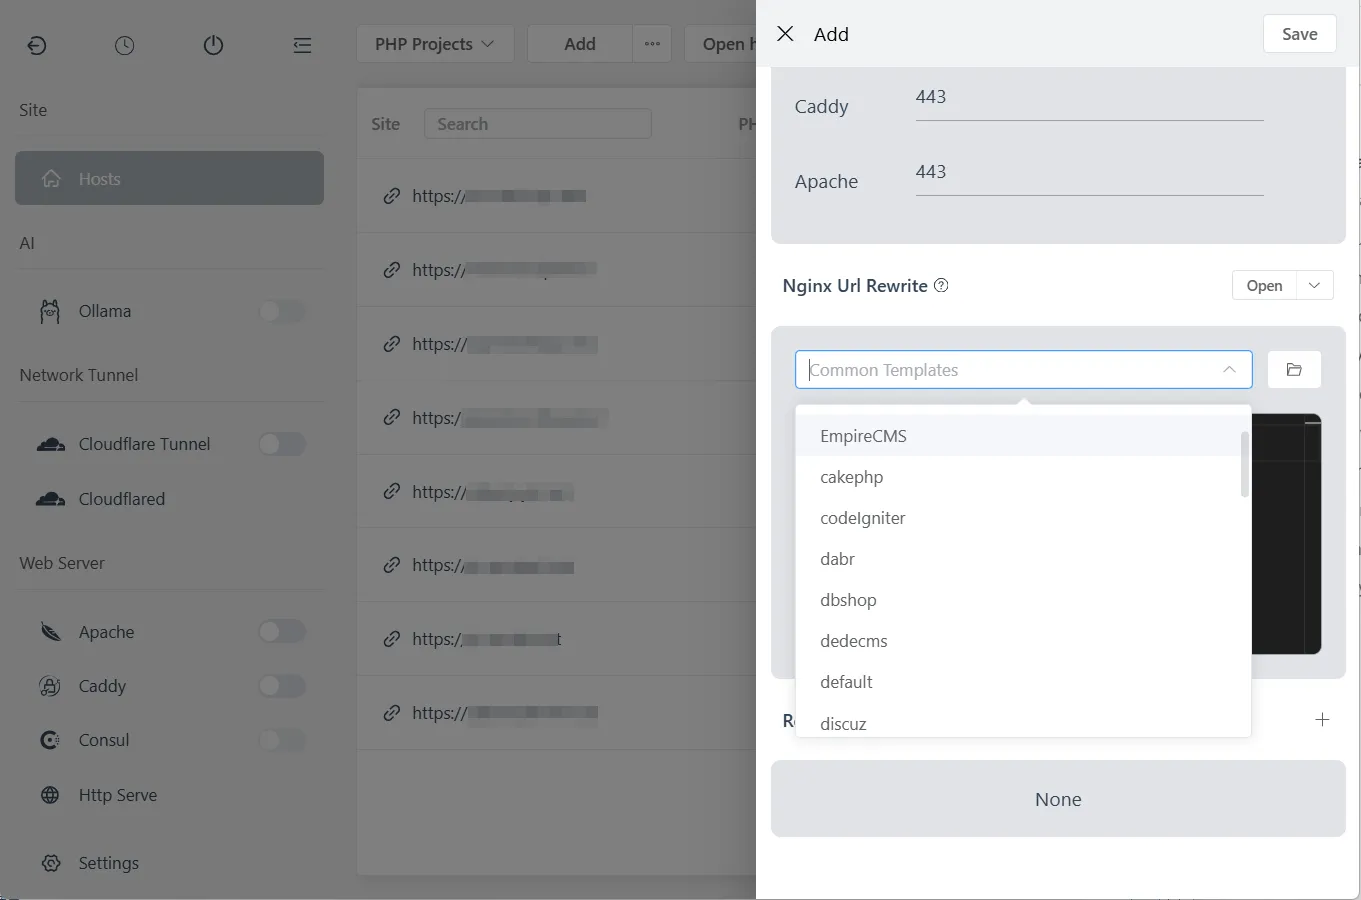
URL Rewriting
Most frameworks require URL rewriting. FlyEnv includes templates:
For Nginx:
# Laravel rewrite
location / {
    try_files $uri $uri/ /index.php?$query_string;
}

# WordPress rewrite
location / {
    try_files $uri $uri/ /index.php;
}
Select template in FlyEnv:
- Edit site
- Click "Rewrite Rules"
- Choose framework template
- Save
Advanced SSL Configuration
Understanding Local SSL
FlyEnv's Auto SSL uses a local Certificate Authority (CA):
Local CA (trusted by system)
    |
    +-- Site Certificate (myproject.test)
    +-- Site Certificate (api.myproject.test)
This allows unlimited local certificates without Let's Encrypt rate limits or DNS validation.
Manual Certificate Import (Linux)
If browsers show warnings:
# Find the CA certificate in FlyEnv settings
# Typically: ~/.flyenv/ssl/rootCA.pem

# Import to system trust (Ubuntu/Debian)
sudo cp rootCA.pem /usr/local/share/ca-certificates/flyenv.crt
sudo update-ca-certificates

# For Chrome specifically
# Settings -> Privacy -> Security -> Manage Certificates -> Authorities -> Import
Using Custom Certificates
For testing with real certificates:
- Obtain certificate files (.crt and .key)
- In site settings, select "Custom SSL"
- Upload certificate files
- Save
Useful for:
- Testing production certificates locally
- Client-provided certificates
- Wildcard certificate testing
Multi-Server Setups
Running Multiple Web Servers
You can run Apache, Nginx, and Caddy simultaneously on different ports:
| Server | Port | Use Case |
|---|---|---|
| Nginx | 80/443 | Primary development |
| Apache | 8080/8443 | Testing .htaccess rules |
| Caddy | 3000 | Quick prototyping |
Configure each site with its preferred server and port.
Load Balancing Simulation
Test load-balanced setups locally:
User Request
    |
    v
Nginx (load balancer) -> localhost:3001 (Instance 1)
                      -> localhost:3002 (Instance 2)
                      -> localhost:3003 (Instance 3)
Configure in Nginx upstream block for realistic testing.
Troubleshooting
"This site cannot be reached"
Check:
- Web server running?
- Correct port?
- Hosts file updated? (FlyEnv does this automatically)
- DNS cache:
sudo killall -HUP mDNSResponder(macOS)
"Your connection is not private" (SSL Error)
macOS:
- FlyEnv should auto-trust the CA
- If not, manually trust in Keychain Access
Windows:
- Import CA certificate to "Trusted Root Certification Authorities"
Linux:
# Update CA store
sudo update-ca-certificates

# Restart browser
"502 Bad Gateway" or "504 Gateway Timeout"
Causes:
- PHP-FPM not running
- Wrong PHP-FPM socket path
- Application error
Solutions:
- Start PHP in FlyEnv
- Check PHP version matches site configuration
- Review application error logs
"403 Forbidden"
Cause: File permissions or directory indexing disabled
Solutions:
- Check folder permissions (755 for directories)
- Ensure index.php/index.html exists
- Enable directory listing in web server config (if desired)
Domains resolving to wrong IP
Cause: External DNS overriding local hosts
Solutions:
- Use
.testTLD (reserved, never has public DNS) - Check
/etc/hostsfor correct entries - Flush DNS cache
Frequently Asked Questions (FAQ)
Q: Can I use real domains like mysite.com locally?
A: Yes, but not recommended. It prevents accessing the real site. Use .test instead.
Q: Will these SSL certificates work for others?
A: No. Local certificates are only trusted on your machine. For sharing, use Cloudflare Tunnel.
Q: How many sites can I create?
A: Unlimited. Limited only by your system resources.
Q: Can I share local sites with my team?
A: Local sites are localhost-only. For team access, use Cloudflare Tunnel or deploy to a shared server.
Q: Do I need to renew local SSL certificates?
A: No. Local certificates generated by FlyEnv do not expire or need renewal.
*Q: Can I use wildcards like .test?
A: Yes. Create a site with *.myproject.test to match any subdomain.
Q: What about IPv6?
A: FlyEnv supports both IPv4 (127.0.0.1) and IPv6 (::1) localhost.
Best Practices
- Use .test TLD — Avoids conflicts with real websites
- Match production structure — Keep local domains similar to production
- Enable SSL always — Test with HTTPS from day one
- Organize with subdomains — api.myapp.test, admin.myapp.test
- Version control configs — Export and commit site configurations
Next Steps
Now that you have professional local hosting set up:
- Reverse Proxy for Node.js — Host Node apps with clean URLs
- Cloudflare Tunnel — Share sites securely
- Email Testing with Mailpit — Complete development environment
Download FlyEnv to get started with custom domains today.