FlyEnv Quick Start Guide: Get Running in 5 Minutes
You have downloaded FlyEnv. Now what? This guide gets you from installation to a running local website in under five minutes—no terminal wizardry required.
Installation
macOS
Option 1: Homebrew (Recommended)
brew update && brew install flyenvOption 2: Download DMG
| Architecture | Download |
|---|---|
| Intel (x86_64) | GitHub Release |
| Apple Silicon (M1/M2/M3) | GitHub Release |
Note for macOS users: If you only need simple PHP hosting, check out FlyPHPServer on the Mac App Store—a lightweight companion app.
Windows
Download and extract the ZIP file:
| Download Source | Link |
|---|---|
| GitHub Release | Download |
| Baidu Netdisk | Download |
Run FlyEnv.exe after extraction.
Linux
Supports Debian/Ubuntu (.deb) and Red Hat/Fedora/SUSE/CentOS (.rpm):
| Distribution | Architecture | Package |
|---|---|---|
| Debian/Ubuntu | x86_64 | .deb |
| Debian/Ubuntu | arm64 | .deb |
| Red Hat/Fedora | x86_64 | .rpm |
| Red Hat/Fedora | arm64 | .rpm |
Download from GitHub Releases.
First Launch Setup
1. Install FlyEnv Helper
On first launch, FlyEnv installs a helper program for system integration:
- macOS/Linux: May prompt for password
- Windows: Run as Administrator if installation fails
This helper manages services and system paths. It is required only once.
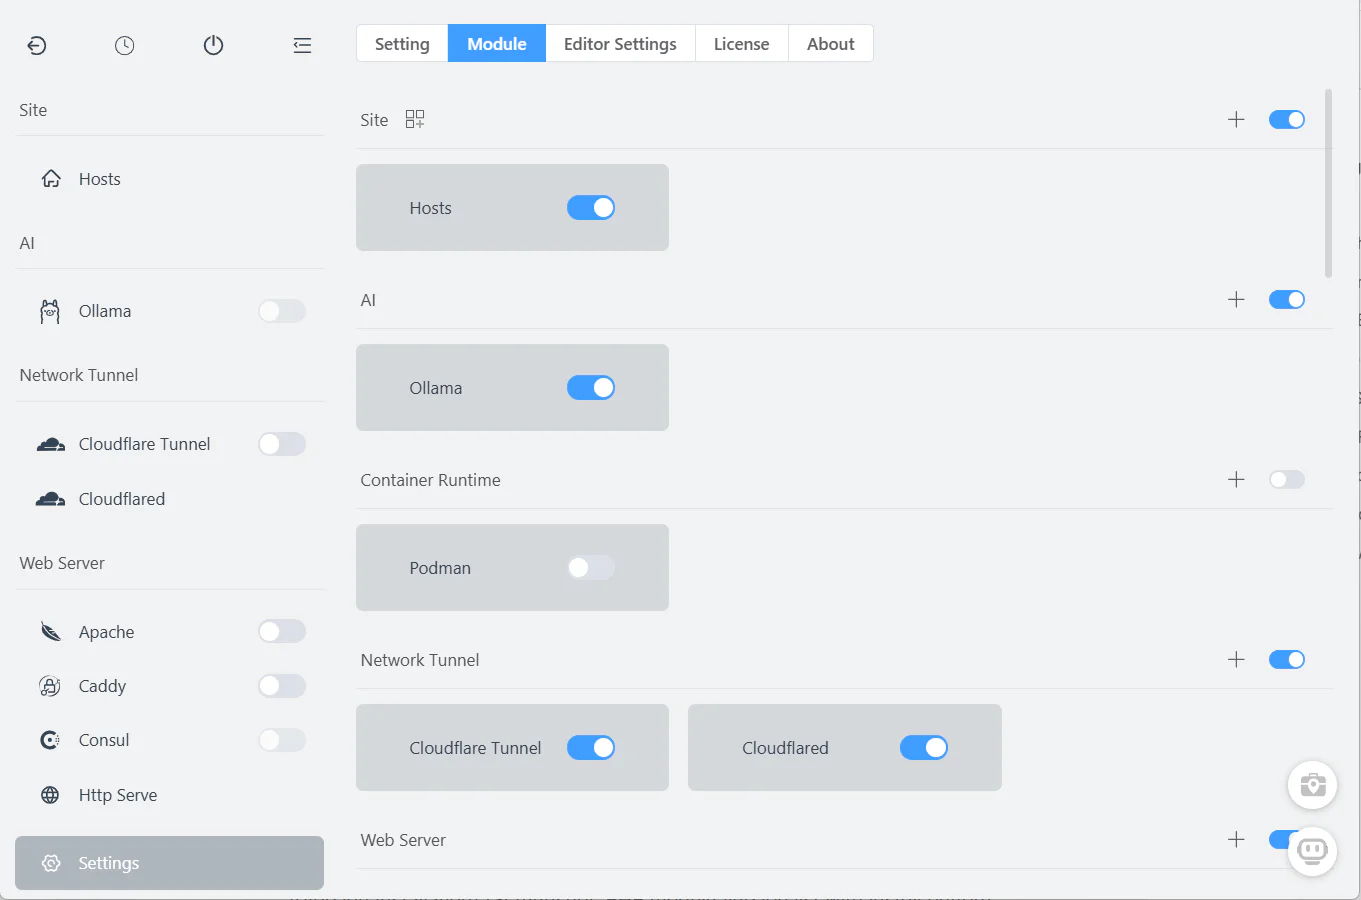
2. Customize Your Interface
FlyEnv shows all modules by default. Simplify your view:
- Click Settings (gear icon)
- Toggle modules you do NOT need off
- Reorder remaining modules by drag-and-drop
Recommended for PHP developers: Keep Apache/Nginx, PHP, MySQL, Redis visible.
Recommended for Node.js developers: Keep Node.js, Nginx, MongoDB visible.
3. Install Your First Version
Each module needs at least one version installed:
- Click a module (e.g., PHP)
- Switch to the Versions tab
- Select a version (e.g., PHP 8.3)
- Click Install
FlyEnv downloads and configures the version automatically.
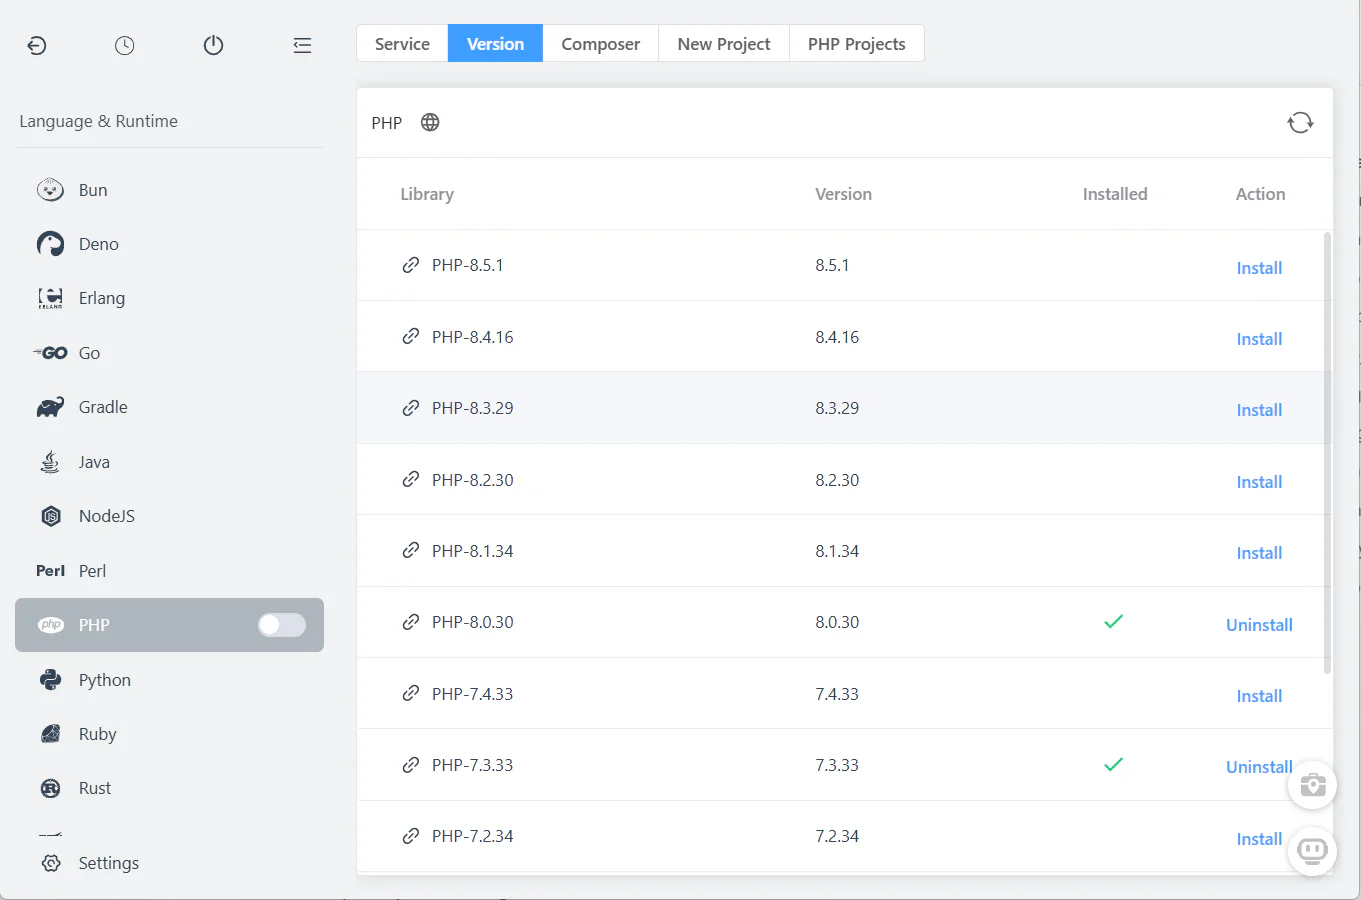
Pro tip: Install multiple versions if you work on different projects. They coexist peacefully.
Create Your First Website
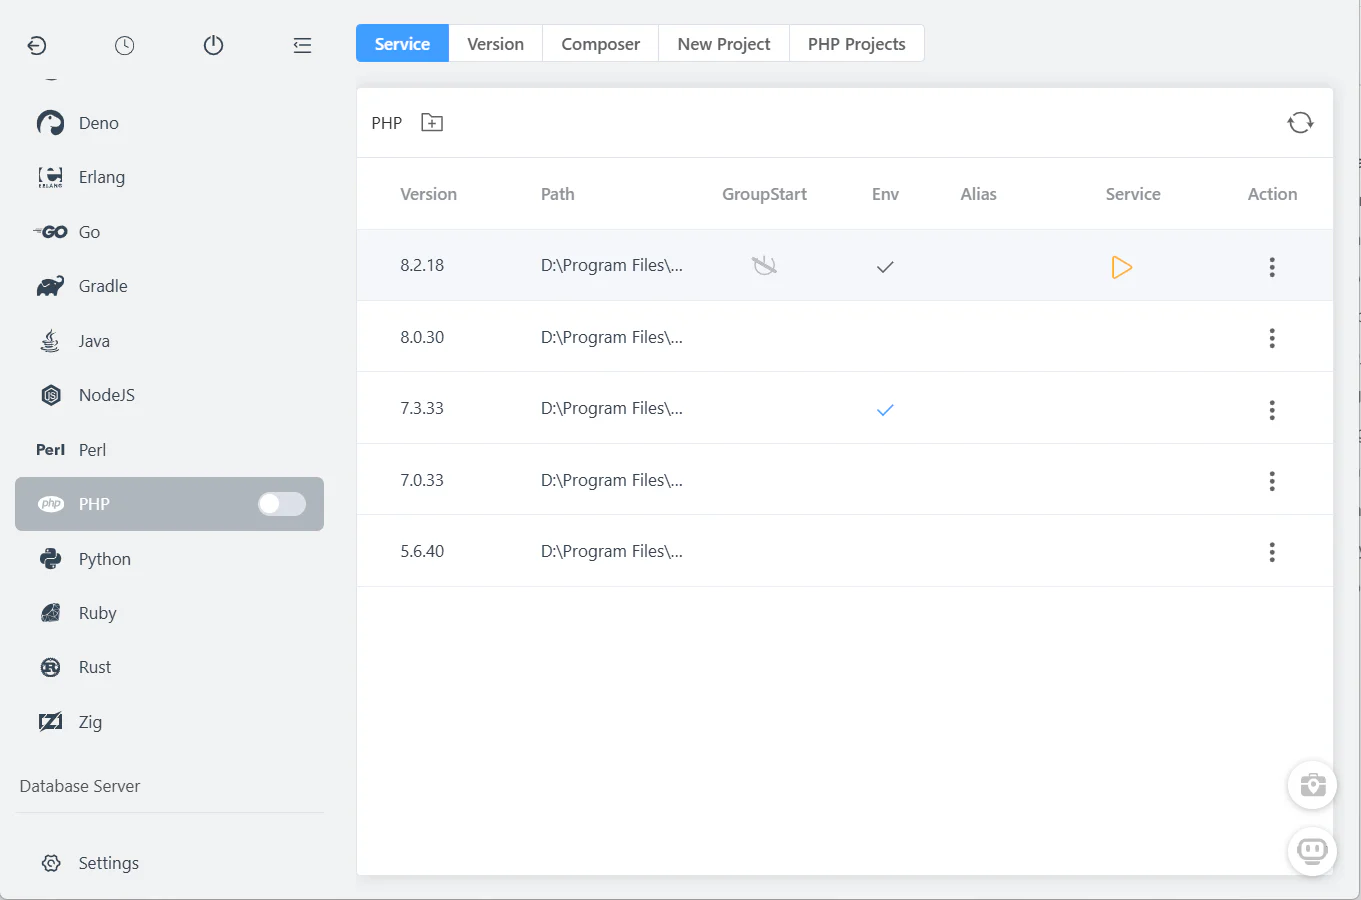
Step 1: Start Required Services
Before creating a site, start your web server and PHP:
- Open Apache or Nginx module
- Select your installed version
- Click the Start button
Do the same for PHP and MySQL if needed.
Step 2: Create a Site
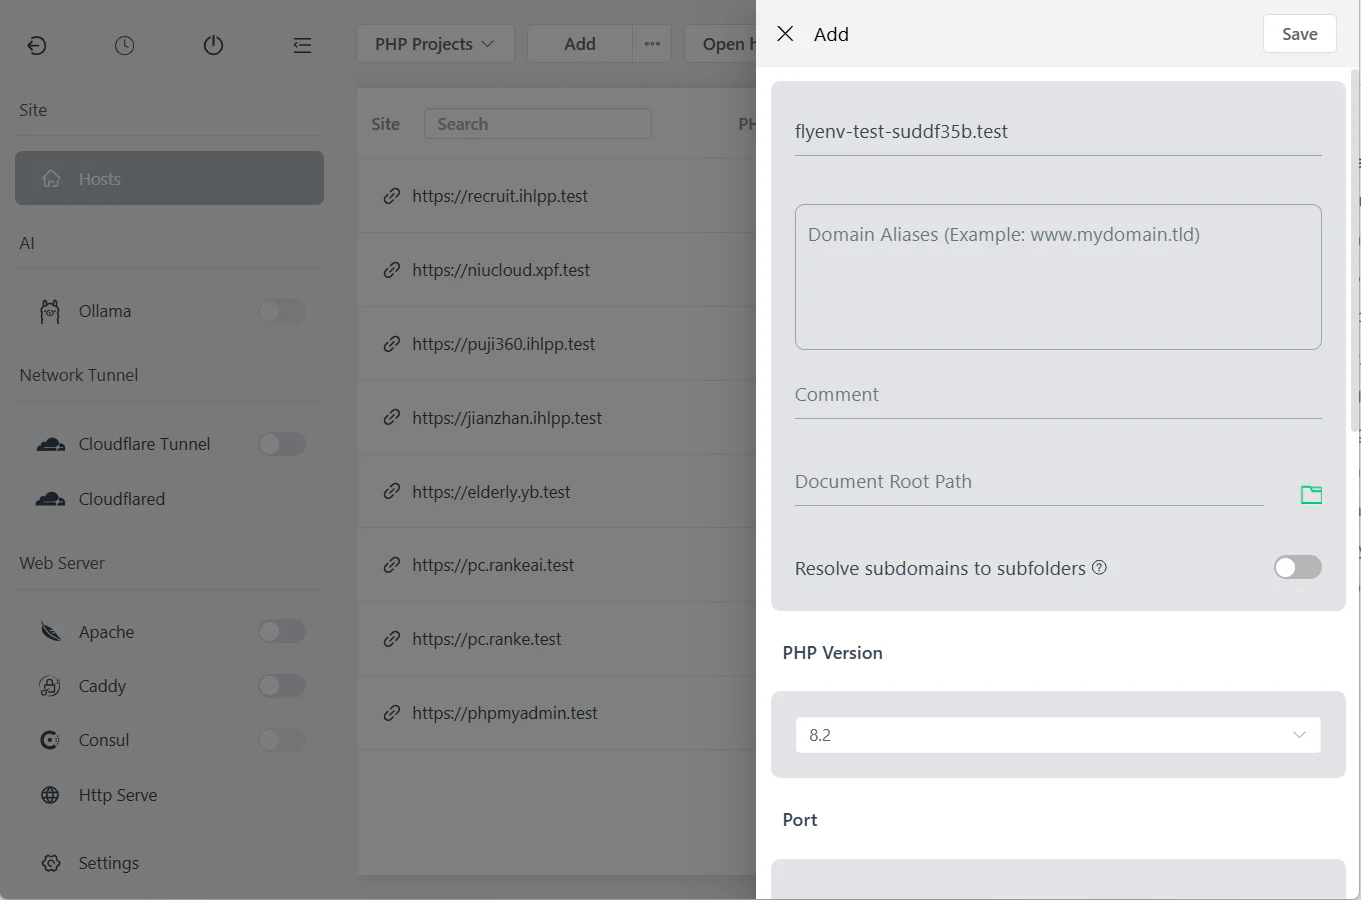
Open the Host module
Click "Add Site"
Fill in the details:
- Domain:
myproject.test(any domain works) - Root Path:
/Users/you/projects/myproject - PHP Version: Select your installed version
- Port: 80 (default)
- Domain:
Enable Auto SSL for HTTPS access
Click Save
Step 3: Access Your Site
After saving:
- Start your web server (if not already running)
- Click the site link in the Host list
- Or open
https://myproject.testin your browser
The SSL certificate is automatically trusted by your system.
Setting Up Environment Variables
FlyEnv can manage your system PATH for terminal access:
- Open any module
- Click "Set to System Path"
- Choose versions to add
For PHP, you can also create aliases:
php74-> PHP 7.4php83-> PHP 8.3


Restart your terminal after setting PATH for changes to take effect.
Quick Project Setup Examples
Laravel Project
# Create project
composer create-project laravel/laravel myproject

# In FlyEnv Host module
# - Domain: myproject.test
# - Root: /path/to/myproject/public
# - PHP: 8.2 or 8.3
# - Nginx rewrite: Select "Laravel" template
WordPress Site
# Download WordPress
curl -O https://wordpress.org/latest.tar.gz
tar -xzf latest.tar.gz

# In FlyEnv
# - Create database in MySQL module
# - Domain: wordpress.test
# - Root: /path/to/wordpress
# - Enable URL rewrite
Static HTML Site
# Create folder
mkdir mystaticsite
echo "<h1>Hello FlyEnv</h1>" > mystaticsite/index.html

# In FlyEnv
# - Domain: static.test
# - Root: /path/to/mystaticsite
# - Set as "Static Site" (no PHP)
Node.js/NestJS Project
# Create NestJS app
npm i -g @nestjs/cli
nest new myapi

# In FlyEnv
# - Start Node.js service
# - Use Nginx reverse proxy to port 3000
# - See reverse proxy guide for details
Managing Services
Start All at Once
Enable GroupStart for modules you want to launch together:
- Open module service panel
- Check GroupStart checkbox
- Use the main "Start All" switch

Check Logs
If a service fails to start:
- Click the Logs button in the module
- Review error messages
- Common issues: port conflicts, missing dependencies
Upgrading FlyEnv
FlyEnv includes auto-update functionality:
- Check Settings -> About for updates
- Or download the latest release manually
Your data is safe: Program files and data are stored separately. Upgrading never deletes your sites or databases.
Uninstallation
Should you need to remove FlyEnv:
macOS
# Remove app
rm -rf /Applications/FlyEnv.app

# Remove data (optional)
rm -rf ~/Library/FlyEnv
rm -rf ~/Library/PhpWebStudy
Windows
- Delete the FlyEnv folder
- Data folder is
FlyEnv-Datain the same directory
Linux
# Remove package
sudo apt remove flyenv  # or rpm equivalent

# Remove data
rm -rf ~/.config/FlyEnv
Troubleshooting
"Port already in use" errors
Cause: Another application using port 80, 443, or 3306
Solution:
# Find process using port 80
sudo lsof -i :80

# Or change FlyEnv ports in settings
"Permission denied" on macOS
Solution: Grant Full Disk Access to FlyEnv in System Preferences -> Security & Privacy
Site shows "502 Bad Gateway"
Causes:
- PHP-FPM not running
- Wrong PHP version selected for site
- Incorrect nginx/apache configuration
Solution: Check PHP-FPM is started and logs for errors.
Changes not reflecting
Solution:
- Clear browser cache
- Restart web server
- Check file permissions
Frequently Asked Questions (FAQ)
Q: Do I need to know command line to use FlyEnv?
A: No. While terminal access is available, everything can be done through the GUI.
Q: Can I use my existing Homebrew installations?
A: Yes. FlyEnv detects Homebrew and Macports installations automatically.
Q: How do I backup my sites?
A: Your project files are in your chosen directories. Database exports can be done through the MySQL module.
Q: Can I import an existing project?
A: Absolutely. Just point the Host root path to your existing project folder.
Q: What domains can I use?
A: Any domain ending in .test, .local, .dev, or custom TLDs. Avoid .local on some networks due to mDNS conflicts.
Next Steps
Now that you are running, explore these features:
- Project-Level Version Isolation — Automatic version switching
- Custom Domains & SSL — Professional local development
- Build Local AI Agent — Offline AI with Ollama
Download FlyEnv if you haven't already, and happy coding!
💬 Community Perspective: See real developer stories and tutorials about FlyEnv on our Community page.